Modern applications are expected to be equipped with powerful search engines. Drupal provides a core search module that is capable of doing a basic keyword search by querying the database. When it comes to storing and retrieving data, databases are very efficient and reliable. They can be also used for basic filtering and aggregating of data. However, they are not very efficient when it comes to searching for specific terms and phrases.

Performing inefficient queries on large sets of data can result in a poor performance. Moreover, what if we want to sort the search results according to their relevance, implement advanced searching techniques like autocompletion, full-text, fuzzy search or integrate search with RESTful APIs to build a decoupled application?
This is where dedicated search servers come into the picture. They provide a robust solution to all these problems. There are a few popular open-source search engines to choose from, such as Apache Solr, Elasticsearch, and Sphinx. When to use which one depends on your needs and situation, and is a discussion for another day. In this article, we are going to explore how we can use Elasticsearch for indexing in Drupal.
What is Elasticsearch?
“Elasticsearch is a highly scalable open-source full-text search and analytics engine. It allows you to store, search, and analyze big volumes of data quickly and in near real time.” – elastic.co
It is a search server built using Apache Lucene, a Java library, that can be used to implement advanced searching techniques and perform analytics on large sets of data without compromising on performance.
“You Know, for Search”
It is a document-oriented search engine, that is, it stores and queries data in JSON format. It also provides a RESTful interface to interact with the Lucene engine.
Many popular communities including Github, StackOverflow, and Wikipedia benefit from Elasticsearch due to its speed, distributed architecture, and scalability.
Downloading and Running Elasticsearch server
Before integrating Elasticsearch with Drupal, we need to install it on our machine. Since it needs Java, make sure you have Java 8 or later installed on the system. Also, the Drupal module currently supports the version 5 of Elasticsearch, so download the same.
- Download the archive from its website and extract it
$ wget https://artifacts.elastic.co/downloads/elasticsearch/elasticsearch-5.6.10.tar.gz
$ tar -zxvf elasticsearch-5.6.10.tar.gz
- Execute the “elasticsearch” bash script located inside the bin directory. If you are on Windows, execute the “elasticsearch.bat” batch file
$ elasticsearch-5.6.10/bin/elasticsearch
The search server should start running on port 9200 port of localhost by default. To make sure it has been set up correctly, make a request at http://localhost:9200/
$ curl http://localhost:9200
If you receive the following response, you are good to go
{
  "name" : "hzBUZA1",
  "cluster_name" : "elasticsearch",
  "cluster_uuid" : "5RMhDoOHSfyI4a9s78qJtQ",
  "version" : {
    "number" : "5.6.10",
    "build_hash" : "b727a60",
    "build_date" : "2018-06-06T15:48:34.860Z",
    "build_snapshot" : false,
    "lucene_version" : "6.6.1"
  },
  "tagline" : "You Know, for Search"
}
Since Elasticsearch does not do any access control out of the box, you must take care of it while deploying it.
Integrating Elasticsearch with Drupal
Now that we have the search server up and running, we can proceed with integrating it with Drupal. In D8, it can be done in two ways (unless you build your own custom solution, of course).
- Using Search API and Elasticsearch Connector
- Using Elastic Search module
Method 1: Using Search API and Elasticsearch Connector
We will need the following modules.
However, we also need two PHP libraries for it to work – des-connector and php-lucene. Let us download them using composer as it will take care of the dependencies.
$ composer require 'drupal/elasticsearch_connector:^5.0'
$ composer require 'drupal/search_api:^1.8'
Now, enable the modules either using drupal console, drush or by admin UI.
$ drupal module:install elasticsearch_connector search_api
or
$ drush en elasticsearch_connector search_api -y
You can verify that the library has been correctly installed from Status reports available under admin/reports/status.
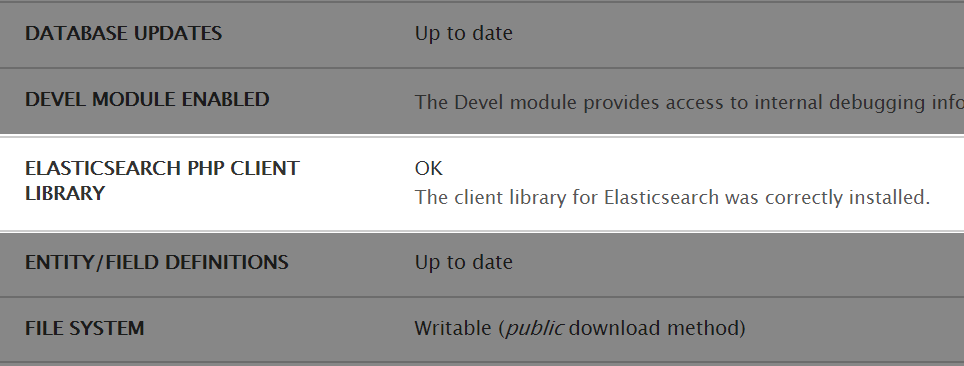
Configuring Elasticsearch Connector
Now, we need to create a cluster (collection of node servers) where all the data will get stored or indexed.
- Navigate to Manage → Configuration → Search and metadata → Elasticsearch Connector and click on “Add cluster” button
- Fill in the details of the cluster. Give an admin title, enter the server URL, optionally make it the default cluster and make sure to keep the status as Active.
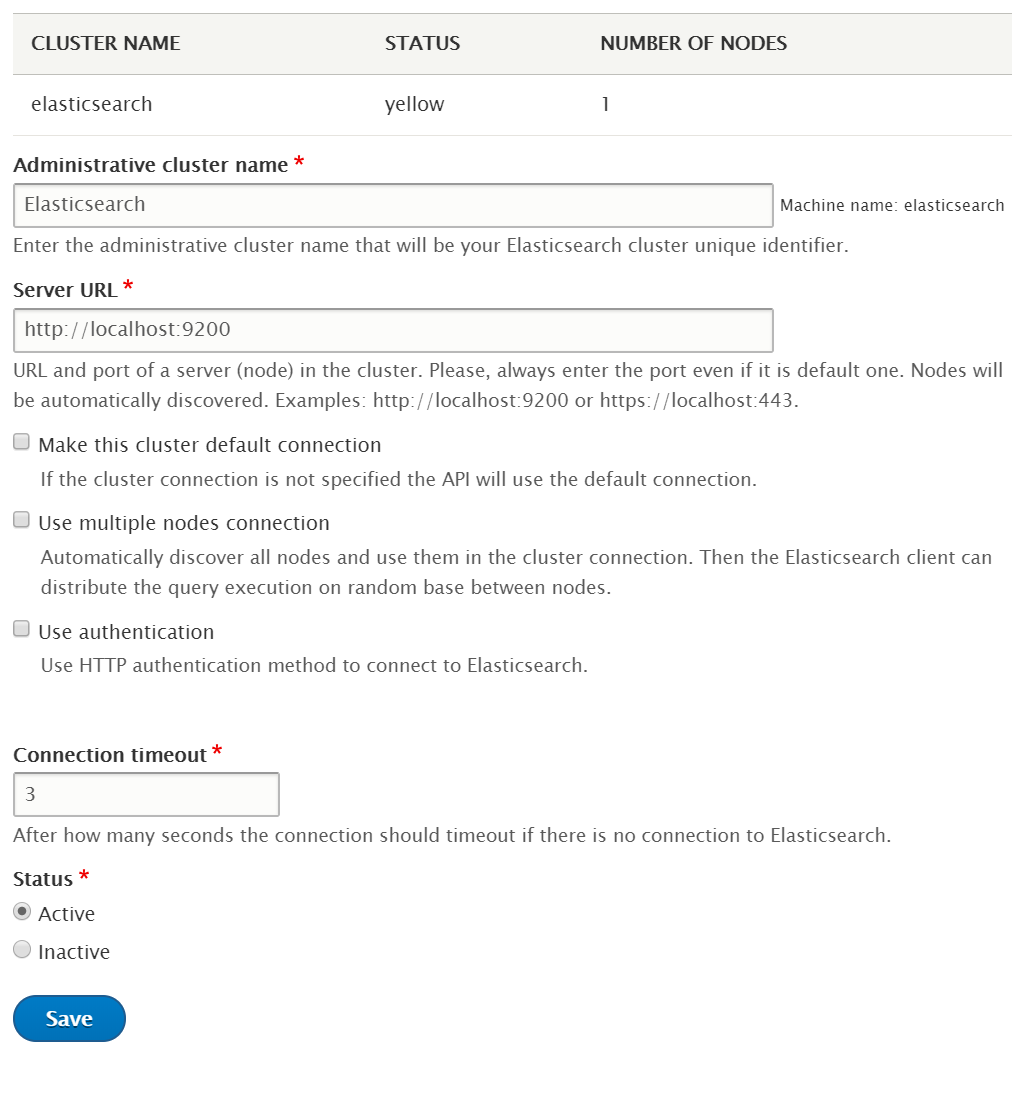
Adding an Elasticsearch Cluster - Click on “Save” button to add the cluster
Adding a Search API server
In Drupal, Search API is responsible for providing the interface to a search server. In our case, it is the Elasticsearch. We need to make the Search API server to point to the recently created cluster.
- Navigate to Manage → Configuration → Search and metadata → Search API and click on “Add server” button
- Give the server a suitable name and description. Select “Elasticsearch” as the backend and optionally adjust the fuzziness
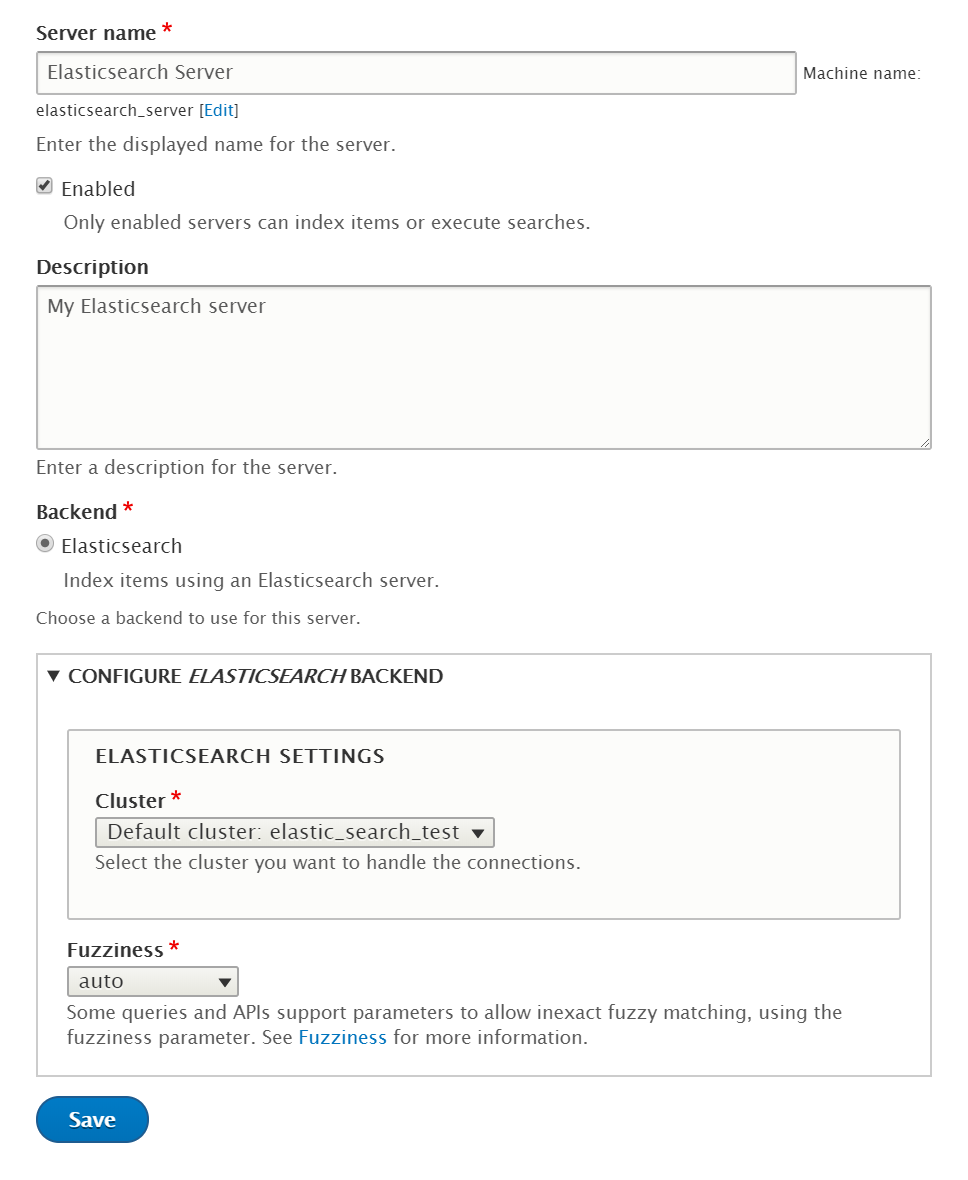
Adding a Search API server - Click on “Save” to add the server
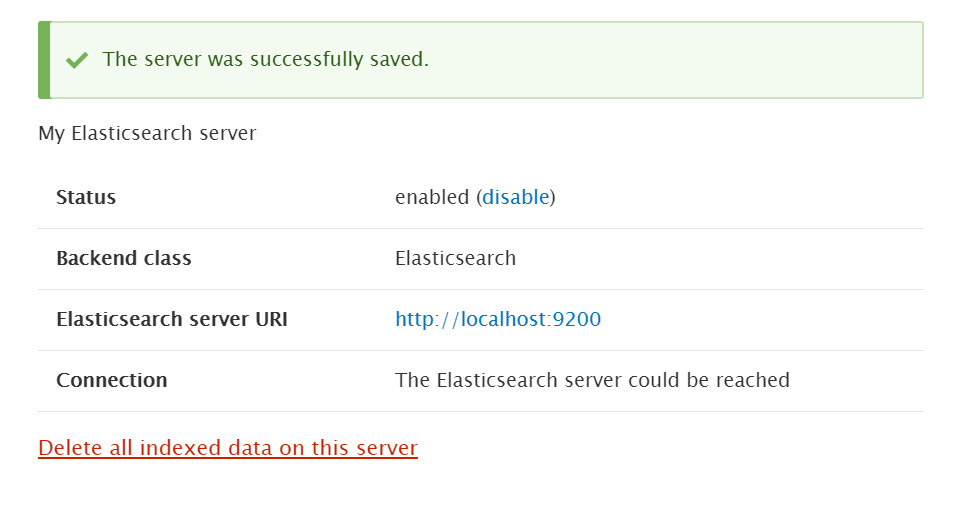
Viewing the status of the newly added server
Creating a Search API Index and adding fields to it
Next, we need to create a Search API index. The terminologies used here can be a bit confusing. The Search API index is basically an Elasticsearch Type (and not Elasticsearch index).
- On the same configuration page, click on “Add Index” button
- Give an administrative name to the index. Select the entities in the data sources which you need to index
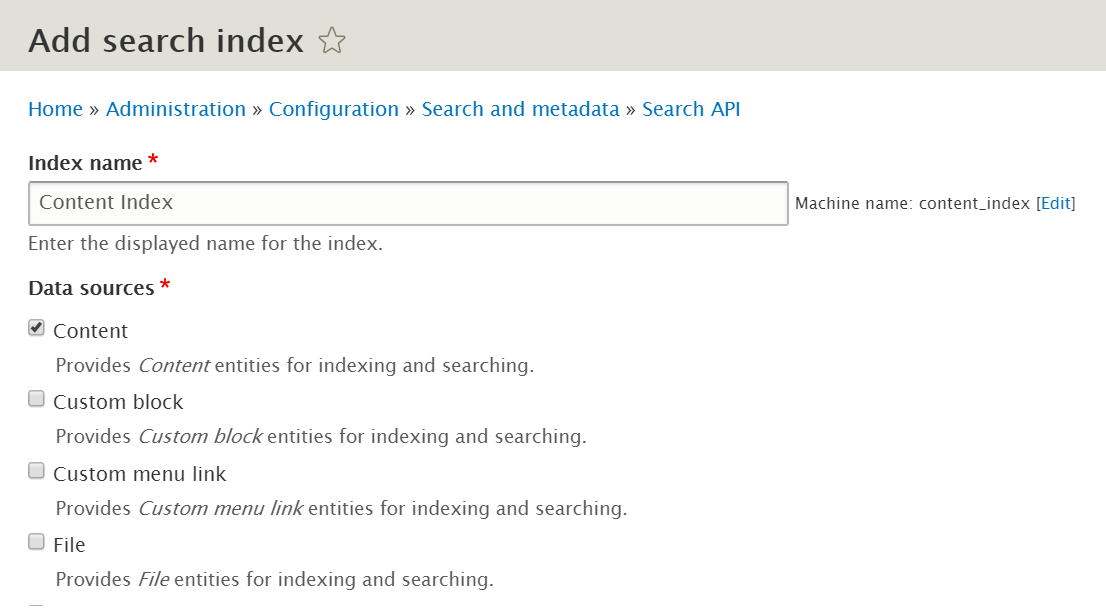
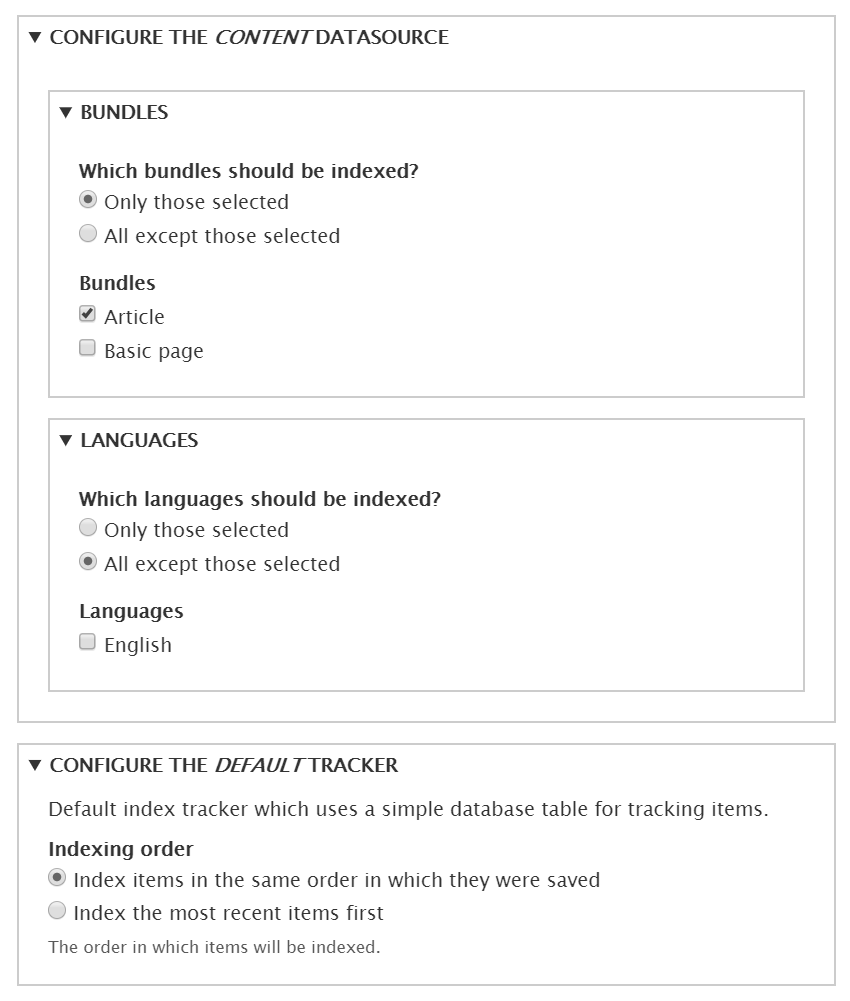
Adding the data sources of the search index - Select the bundles and language to be indexed while configuring the data source, and also select the indexing order.
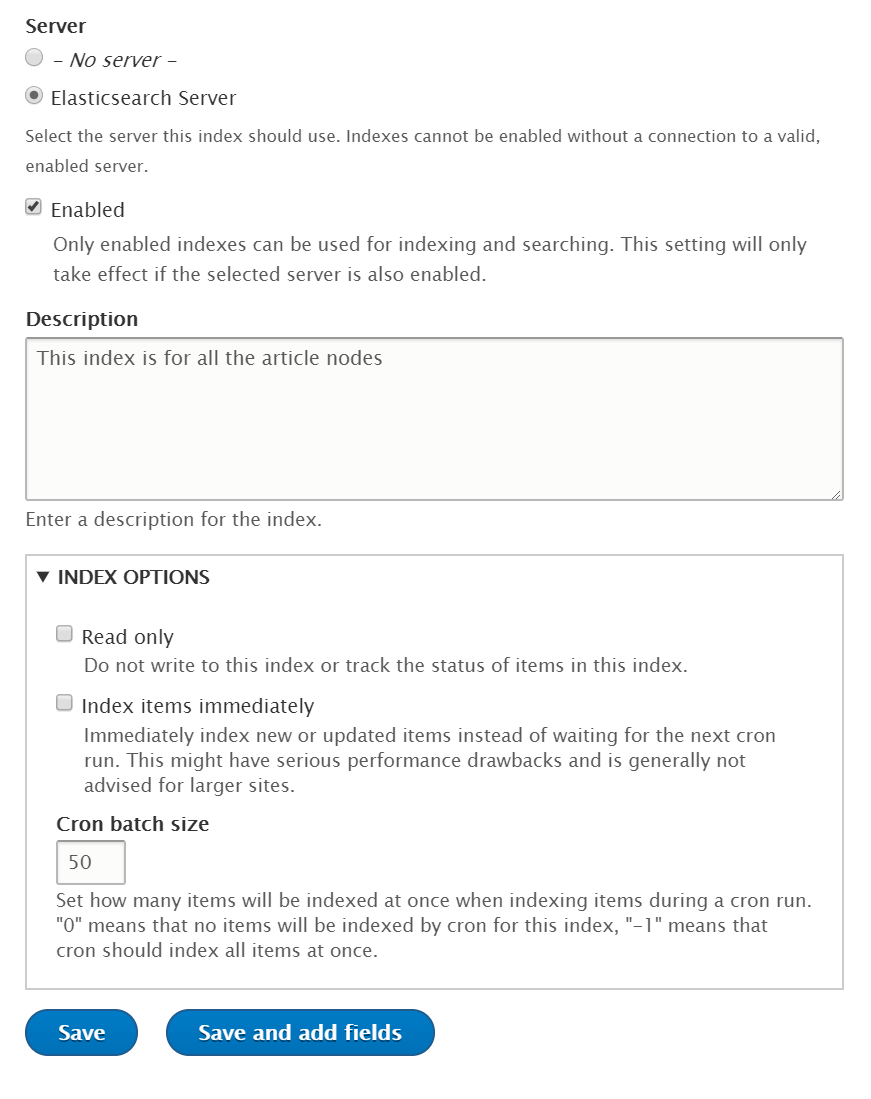
Configuring the added data sources - Next, select the search API server, check enabled. You may want to disable the immediate indexing. Then, click on “Save and add fields”
Configuring the search index options - Now, we need to add the fields to be indexed. These fields will become the fields of the documents in our Elasticsearch index. Click on the “Add field” button.
- Click on “Add” button next to the field you wish to add. Let’s add the title and click on “Done”
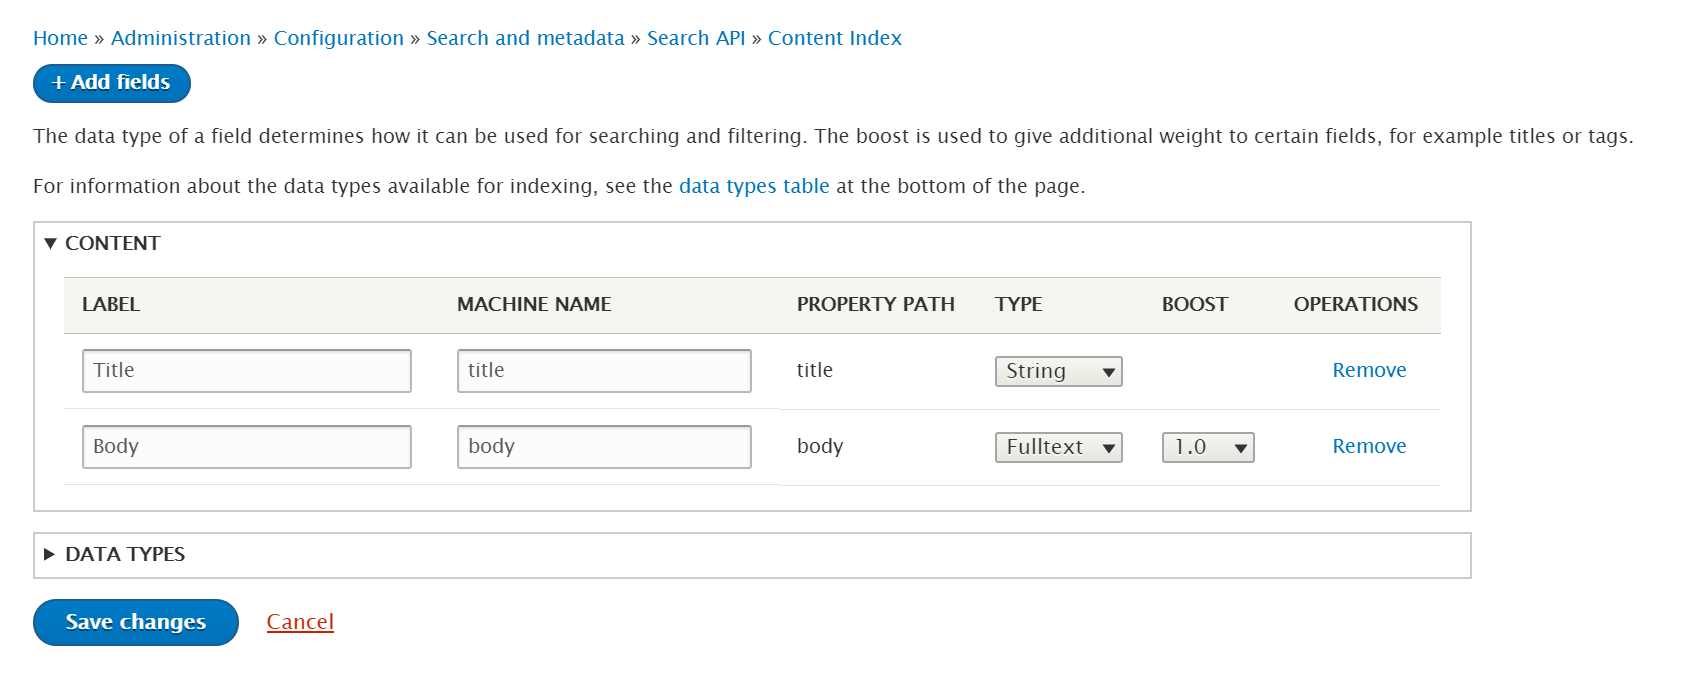
Adding the required fields to the index - Now, configure the type of the field. This can vary with your application. If you are implementing a search functionality, you may want to select “Full-text”

Customizing the fields of the index - Finally, click on “Save Changes”
Processing of Data
This is an important concept of how a search engine works. We need to perform certain operations on data before indexing it into the search server. For example, consider an implementation of a simple full-text search bar in a view or a decoupled application.
- To implement this, click on the “Processors” tab. Enable the following and arrange them in this order.
- Tokenization: Split the text into tokens or words
- Lower Casing: Change the case of all the tokens into lower
- Removing stopwords: Remove the noise words like ‘is’, ‘the’, ‘was’, etc
- Stemming: Chop off or modify the end of words like ‘–-ing’, ‘–uous’, etc
Along with these steps, you may enable checks on Content access, publishing status of the entity and enable Result Highlighting
- Scroll down to the bottom, arrange the order and enable all the processes from their individual vertical tabs.
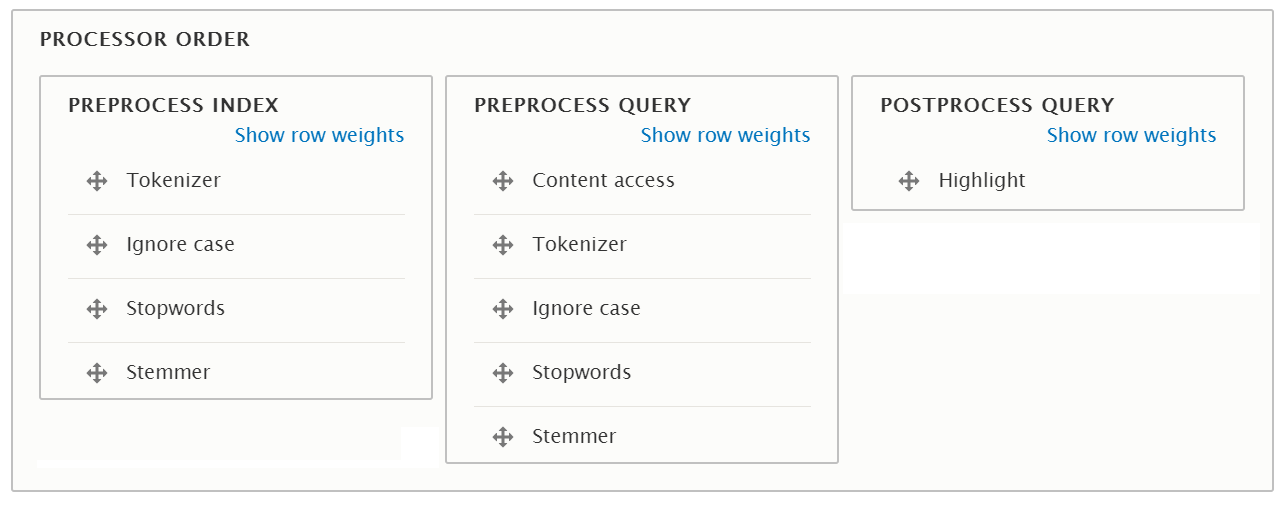
Arranging the order of Processors -
Click on “Save” to save the configuration.
Note that the processes that need to be applied can vary on your application. For example, you shouldn’t remove the stopwords if you want to implement Autocompletion.
Indexing the content items
By default, Drupal cron will do the job of indexing whenever it executes. But for the time being, let’s index the items manually from the “View” tab.
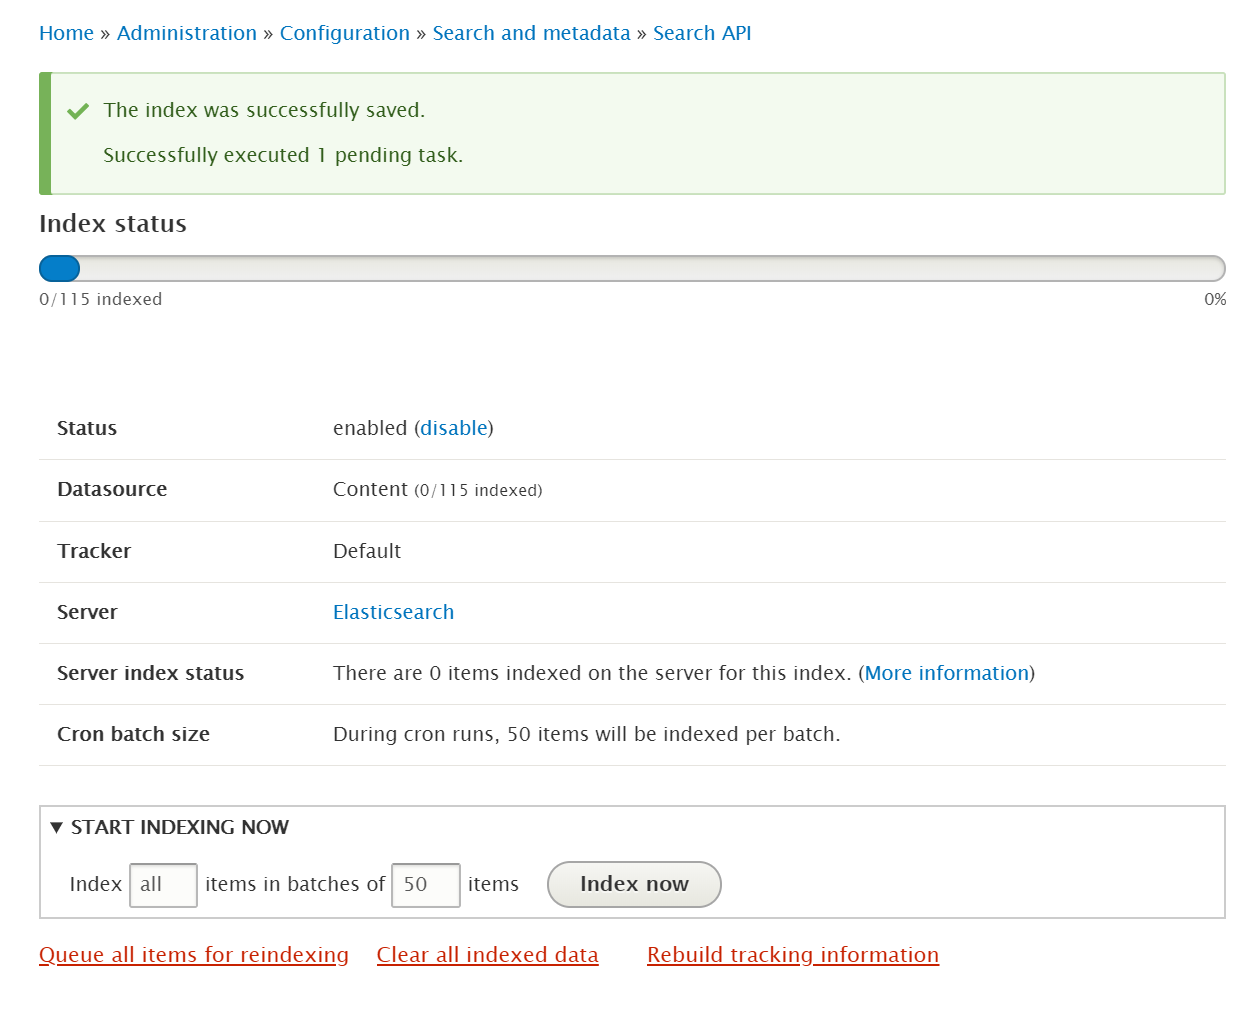
Optionally alter the batch size and click on “Index now” button to start indexing.

Now, you can view or browse the created index using the REST interface or a client like Elasticsearch Head or Kibana.
$ curl http://localhost:9200/elasticsearch_drupal_content_index/_search?pretty=true&q=*:*
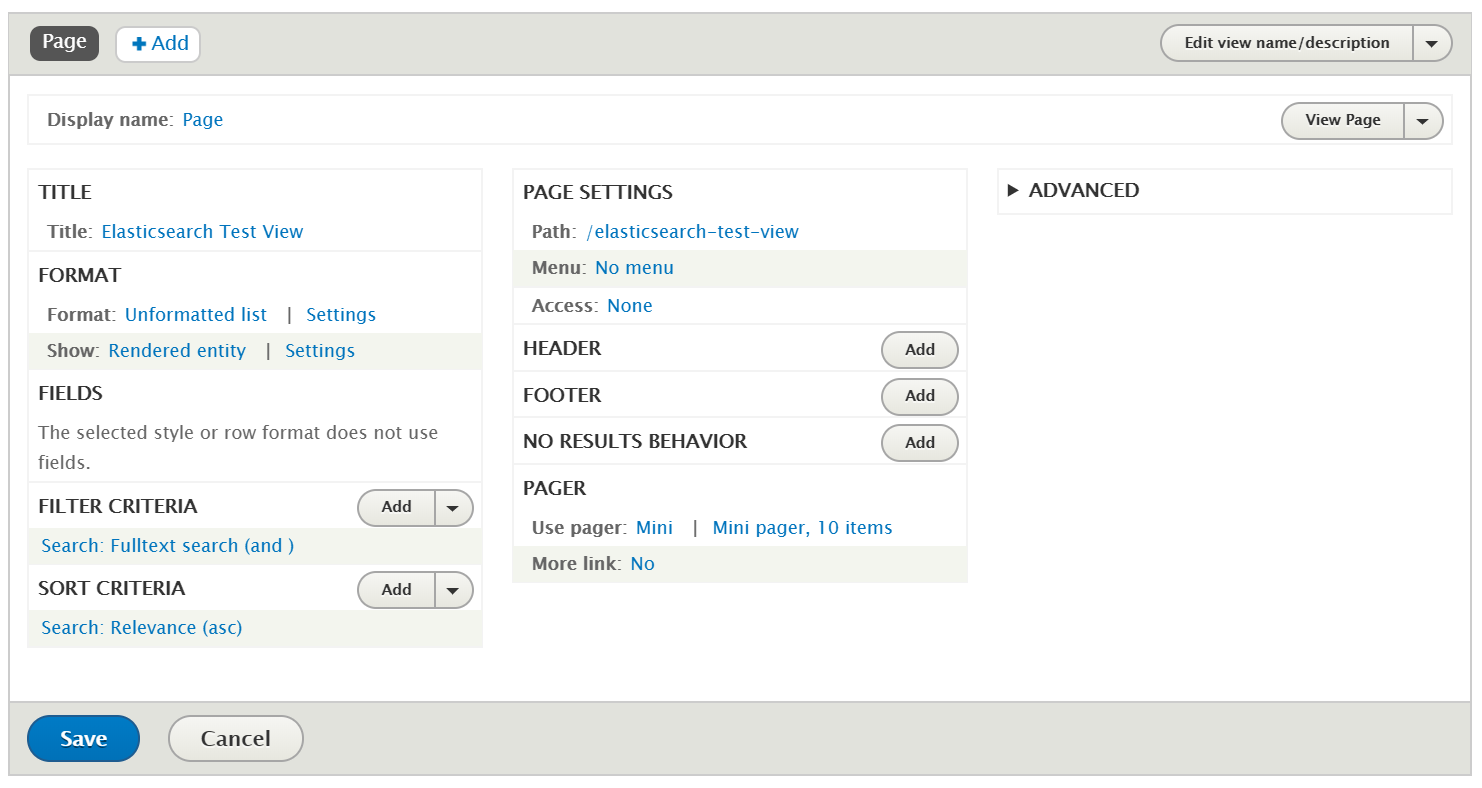
You may create a view with the search index or use the REST interface of Elasticsearch to build a decoupled application.

Method 2: Using Elastic Search module
As you may notice, there is a lot of terminology mismatch between Search API and Elasticsearch’s core concepts. Hence, we can alternatively use this method.
For this, we will need the Elastic Search module and 3 PHP libraries – elasticsearch, elasticsearch-dsl, and twlib. Let’s download the module using composer.
$ composer require 'drupal/elastic_search:^1.2'
Now, enable it either using drupal console, drush or by admin UI.
$ drupal module:install elastic_search
or
$ drush en elastic_search -y
Connecting to Elasticsearch Server
First, we need to connect the module with the search server, similar to the previous method.
- Navigate to Configuration → Search and metadata → Elastic Server
- Select HTTP protocol, add the elastic search host and port number, and optionally add the Kibana host. You may also add a prefix for indices. Rest of the configurations can be left at defaults.
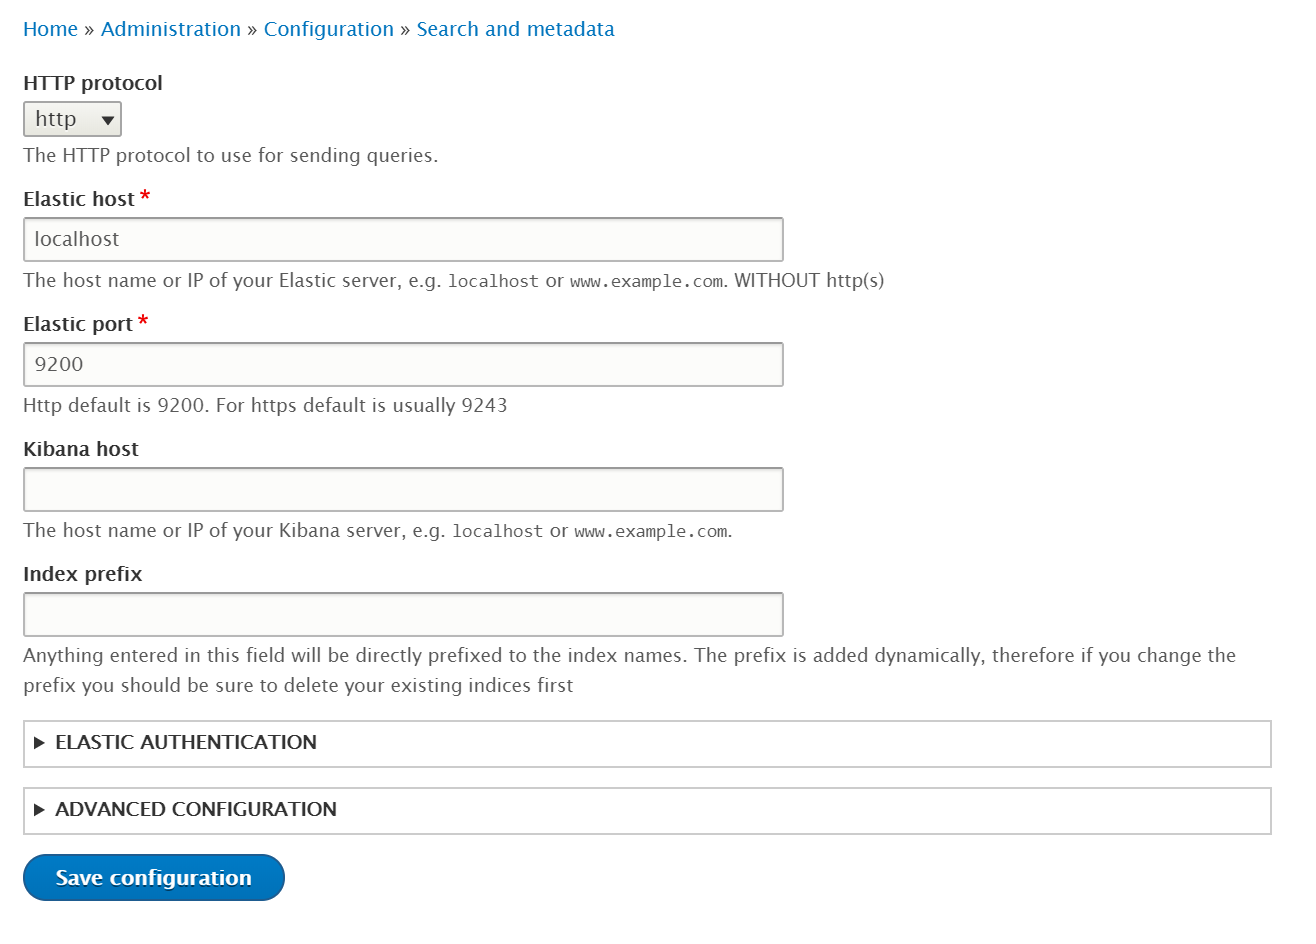
Adding the Elasticsearch server - Click on “Save configurations” to add the server
Generating mappings and configuring them
A mapping is essentially a schema that will define the fields of the documents in an index. All the bundles of entities in Drupal can be mapped into indices.
- Click on “Generate mappings”
- Select the entity type, let’s say node. Then select its bundles. Optionally allow mapping of its children
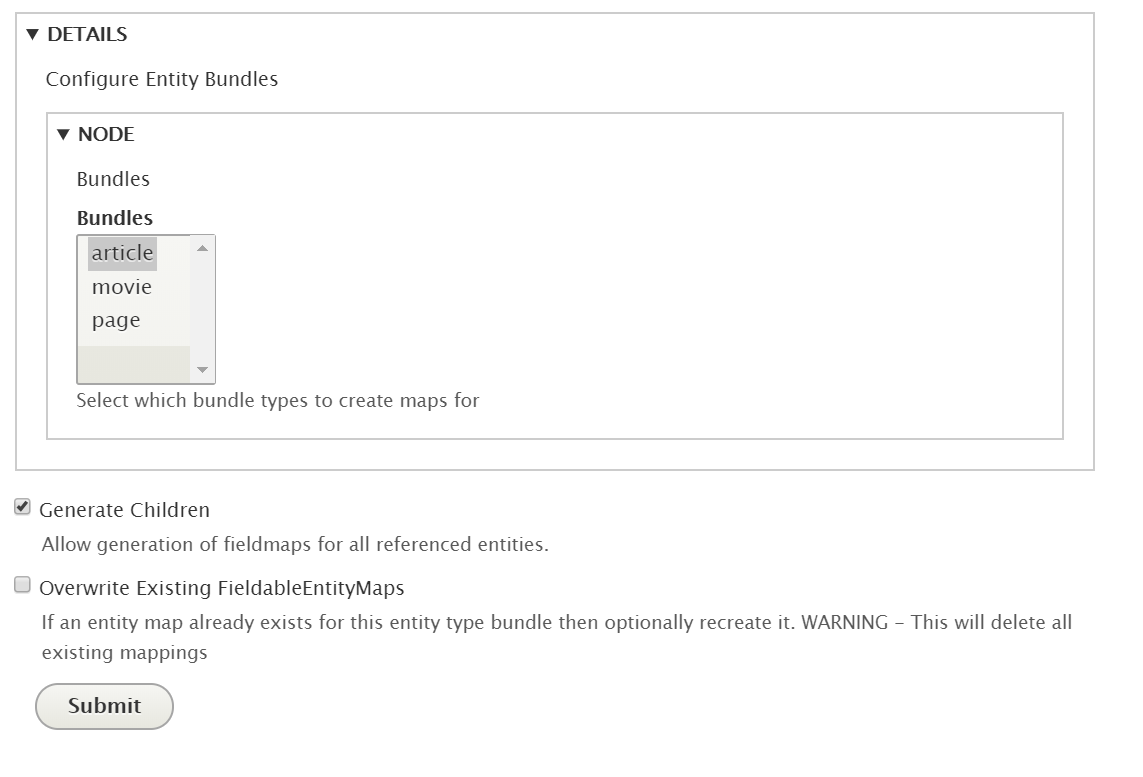
Adding the entity and selecting its bundles to be mapped - Click on “Submit” button. It will automatically add all the fields, you may want to keep only the desired fields and configure them correctly. Their mapping DSL can also be exported.
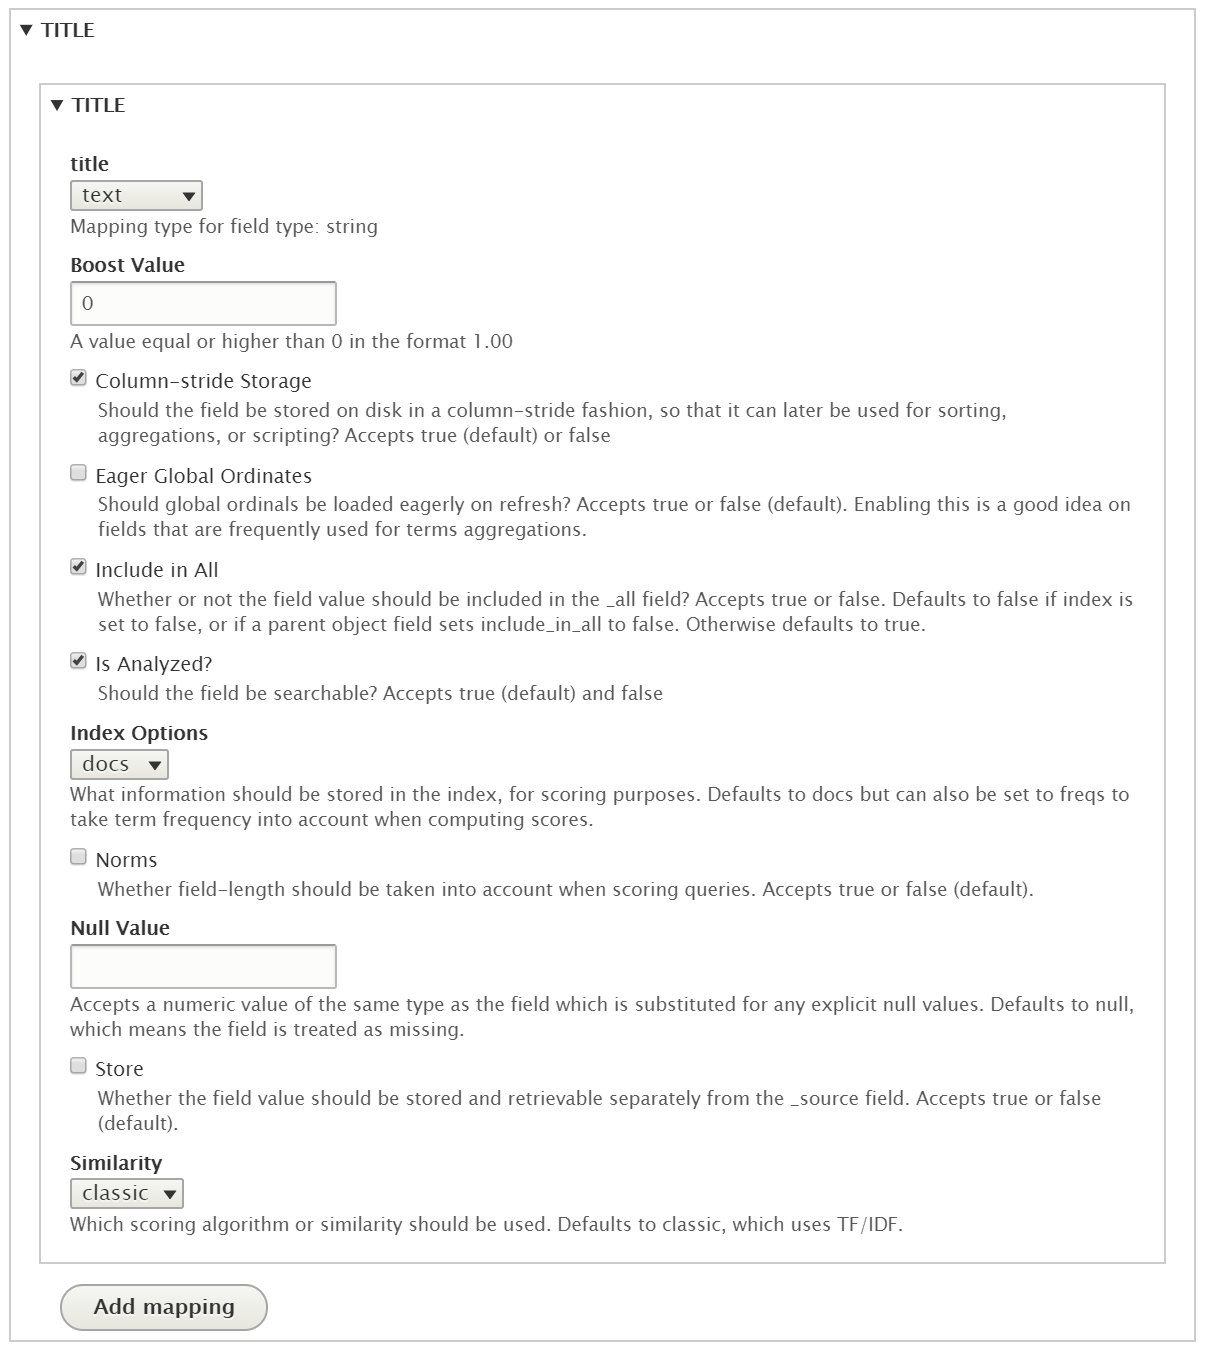
Configuring the fields of a bundle
Generating index and pushing the documents
Now, we can push the indices and the required documents to the search server.
- For that, move on to the indices tab, click on “Generate New Elastic Search Indices” and then click on “Push Server Indices and Mappings”. This will create all the indices on the server.
- Now index all the nodes using “Push All Documents”. You may also push the nodes for a specific index. Wait for the indexing to finish.

Managing the indices using the admin UI
Conclusion
Drupal entities can be indexed into the Elasticsearch documents, which can be used to create an advanced search system using Drupal views or can be used to build a decoupled application using the REST interface of Elasticsearch.
While Search API provides an abstract approach, the Elastic Search module follows the conventions and principles of the search engine itself to index the documents. Either way, you can relish the flexibility, power, and speed of Elasticsearch to build your desired solution.
Subscribe
Related Blogs
Inside the Drupal AI Summit: Themes, Speaker and What To Expect

“ The web is changing fast, and AI is rewriting the rules. It writes content, builds pages, and answers questions directly,…
FOST and Drupal AI Initiative: Next Era of Responsible AI

Three years after the launch of generative AI tools marked a new age for artificial intelligence, almost 90% of survey…
Drupal AI Ecosystem Part 5: AI Content Suggestions

Drupal has steadily evolved from being just a content management system into a flexible platform that incorporates emerging…


