The number of mobile users who access the web has been ever increasing and it has forced content publishers to provide a better experience. These mobile users could potentially be on limited bandwidth with lower internet speeds and low-end devices.
A standard built on top of existing technologies to speed up the loading of web pages on mobile devices.
As a result, advertisements, offer pop-ups, fancy CSS and heavy JavaScript can often result in a sluggish experience for such users. But as a publisher, you need to monetize your content while making sure you don’t compromise on quality user experience. What are your options?
- Native Mobile Applications
Native mobile apps provide a faster and more interactive experience when compared to their web counterparts. They integrate better with mobile’s OS and provide a familiar UI & UX. But they are platform dependent and their development and maintenance come at a cost.
- In-house performance optimizations
You can adopt performance optimization strategies like caching the static content on popular CDNs like Cloudflare, bundling and minifying the CSS and JS, and serving the optimized media files. For this, you need resources and an experienced team of developers.
- Platforms like Facebook Instant Articles and Apple News
They provide publishers with their platforms to serve their content and allow monetization through advertisements. However, their biggest drawback is that they are bound to their platforms.
- Google AMP
Google AMP (Accelerated Mobile Pages) is an open source project that focuses on providing a faster content delivery and page rendering. The best part about this is the integration with existing CMS like Drupal and Wordpress.
What exactly is AMP and how does it work?
AMP is essentially a standard built on top of existing technologies designed to speed up the loading of web pages on mobile devices. It does that by applying certain restrictions and providing a proxy-based CDN to cache your pages.
If your web pages follow these standards, they become eligible to be cached by Google and appear in the search results and carousels with the AMP logo, indicating that they offer a fast experience.
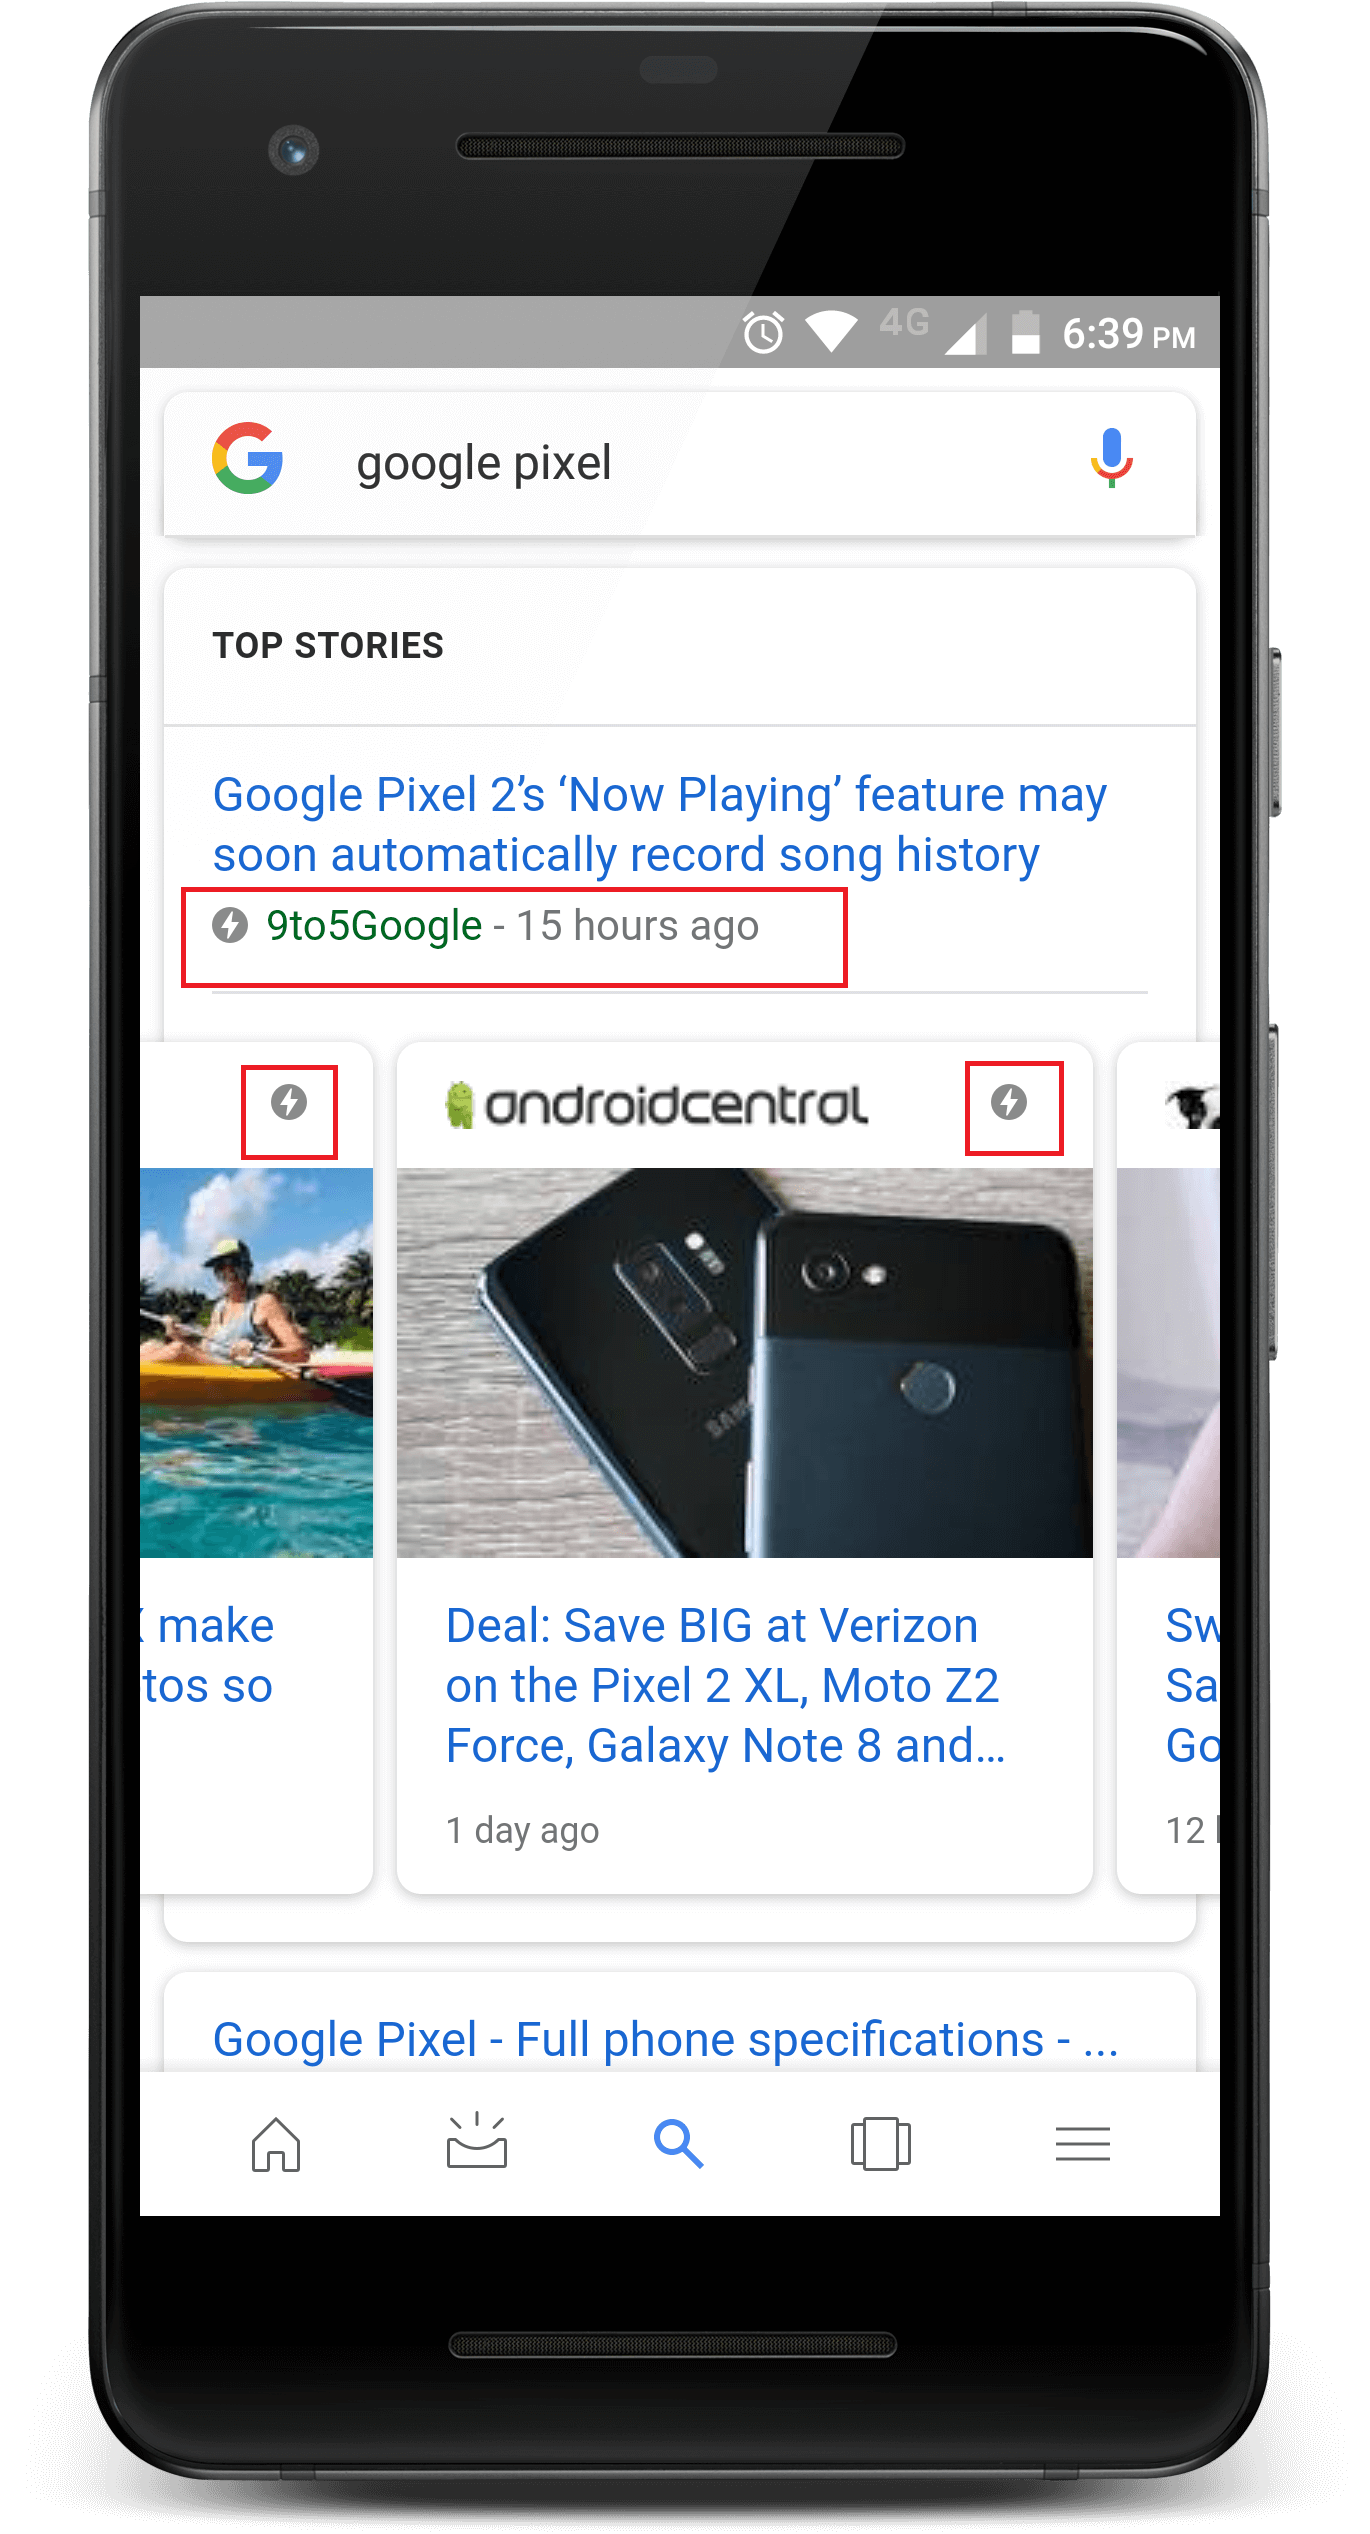
This is a very high-level description and there are a lot of technical details under the hood. Let us understand some of the basics before looking at how we can leverage AMP in Drupal.
You make two copies of your pages – one regular and one that follows the AMP standard. The regular page must have a special tag that links to the AMP page (the crawlers and bots will look for this).
<link rel="amphtml" href="http://www.example.com/page?amp">
The AMPed version of this page must be written in AMP HTML (a restricted version of HTML), must include an external JavaScript library (https://cdn.ampproject.org/v0.js), some boilerplate JavaScript code, and a link to the regular version of the page.
<!doctype html>
<html amp>
  <head>
    <meta charset="utf-8">
    <link rel="canonical" href="http://www.example.com/page.html" />
    <meta name="viewport" content="width=device-width,minimum-scale=1">
    <style amp-boilerplate>body{-webkit-animation:-amp-start 8s steps(1,end) 0s 1 normal both;-moz-animation:-amp-start 8s steps(1,end) 0s 1 normal both;-ms-animation:-amp-start 8s steps(1,end) 0s 1 normal both;animation:-amp-start 8s steps(1,end) 0s 1 normal both}@-webkit-keyframes -amp-start{from{visibility:hidden}to{visibility:visible}}@-moz-keyframes -amp-start{from{visibility:hidden}to{visibility:visible}}@-ms-keyframes -amp-start{from{visibility:hidden}to{visibility:visible}}@-o-keyframes -amp-start{from{visibility:hidden}to{visibility:visible}}@keyframes -amp-start{from{visibility:hidden}to{visibility:visible}}</style><noscript><style amp-boilerplate>body{-webkit-animation:none;-moz-animation:none;-ms-animation:none;animation:none}</style></noscript>
     <script async src="https://cdn.ampproject.org/v0.js"></script>
  </head>
  <body>Hello, World!</body>
</html>
There are many restrictions and regulations in AMP HTML, such as regarding the use of special AMP tags like <amp-img> (instead of the regular <img> tag) which is used to ensure that the size of the image is known before loading it to prevent the bouncing loading.
<amp-img src="image.jpg" width="640" height="320"></amp-img>
It includes support for ads and analytics using the <amp-ad>, <amp-analytics> and <amp-pixel> tags. Other restrictions include no use of custom JavaScript and only internal style sheets with size up to 50 KB. The complete list of these restrictions and available components is available at www.ampproject.org.
Now, in Drupal, as usual, there is a contributed module that will take care of all this for us. But before configuring and implementing it, let us see how to get AMP for our Drupal site.
Downloading and Installing AMP in Drupal
We basically need 4 things – the AMP PHP library, AMP theme, AMP, and Schema.org Metatag. But Token is required as a dependency for the AMP and Metatag for Schema.org Metatag. The best way to download them is using composer, as it will handle all the dependencies for us.
$ composer require drupal/amp
$ composer require drupal/amptheme
$ composer require drupal/schema_metatag
Now, we can enable the modules and the theme either using drush, drupal console or admin UI.
$ drush en token metatag schema_metatag amp -y
$ drush en amptheme ampsubtheme_example -y
Or
$ drupal module:install token metatag schema_metatag amp
$ drupal theme:install amptheme ampsubtheme_example
Implementing AMP in Drupal
We need to understand a few things before enabling and configuring AMP on our Drupal site.
The AMP pages will work only for the node pages i.e. pages with URL as either /node/{nid} or /node/{alias}. By default, it is disabled and we need to enable AMP for the required content types (or node bundles).
Speed up the loading of your web pages, monetize your content, and improve the end user experience, by implementing AMP.
The AMP module provides an “AMP” view mode for our node entity type. This view mode is accessible only when we add an “amp” parameter in our request.
    Regular Page :  {your-drupal-site}/node/{nid}
    AMP Version  :   {your-drupal-site}/node/{nid}?amp=1
We must use one sub-theme of the AMP theme. An “ExAMPle” base theme is provided along with it for us to try out. This theme will be used only in the AMP view mode. It is highly recommended to make a subtheme using the AMP base theme.
Enabling and Configuring AMP
As mentioned earlier, we need to enable AMP for the content types or node bundles. You may not need it for every content type. To enable it, follow the steps:
- Navigate to Manage → Configuration → AMP Configuration.
- Click on “Enable AMP in Custom Display Settings” against the content type for which you want to enable AMP.
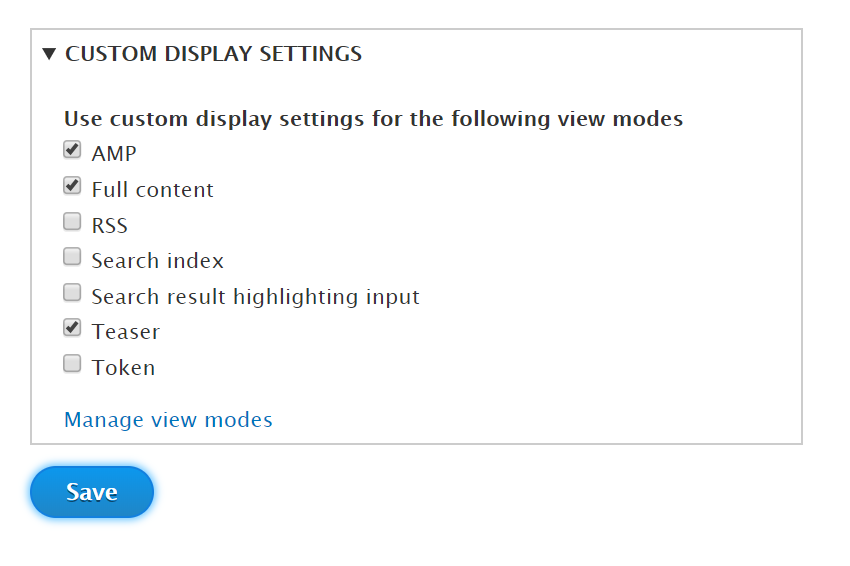
Enabling AMP for a content type - Expand the custom display settings, check “AMP” and click on “Save”.
- Now, we can select an AMP theme, optionally add our Analytics, Adsense or DoubleClick ID. You may also use AMP pixel for tracking purposes. This is similar to email trackers.
Additionally, enable debugging and Power User options while developing. They provide useful stats and warnings in case our page is not up to the AMP standards. The AMP PHP Library will go over through our entire HTML page and convert any non-AMP tags and elements to their counterparts or remove them. This is useful because if the editor is allowed to put HTML in WYSIWYG, then our page could potentially contain unsupported AMP tags and Google will put a penalty on it.
Finally, click on “Save configuration” when done.
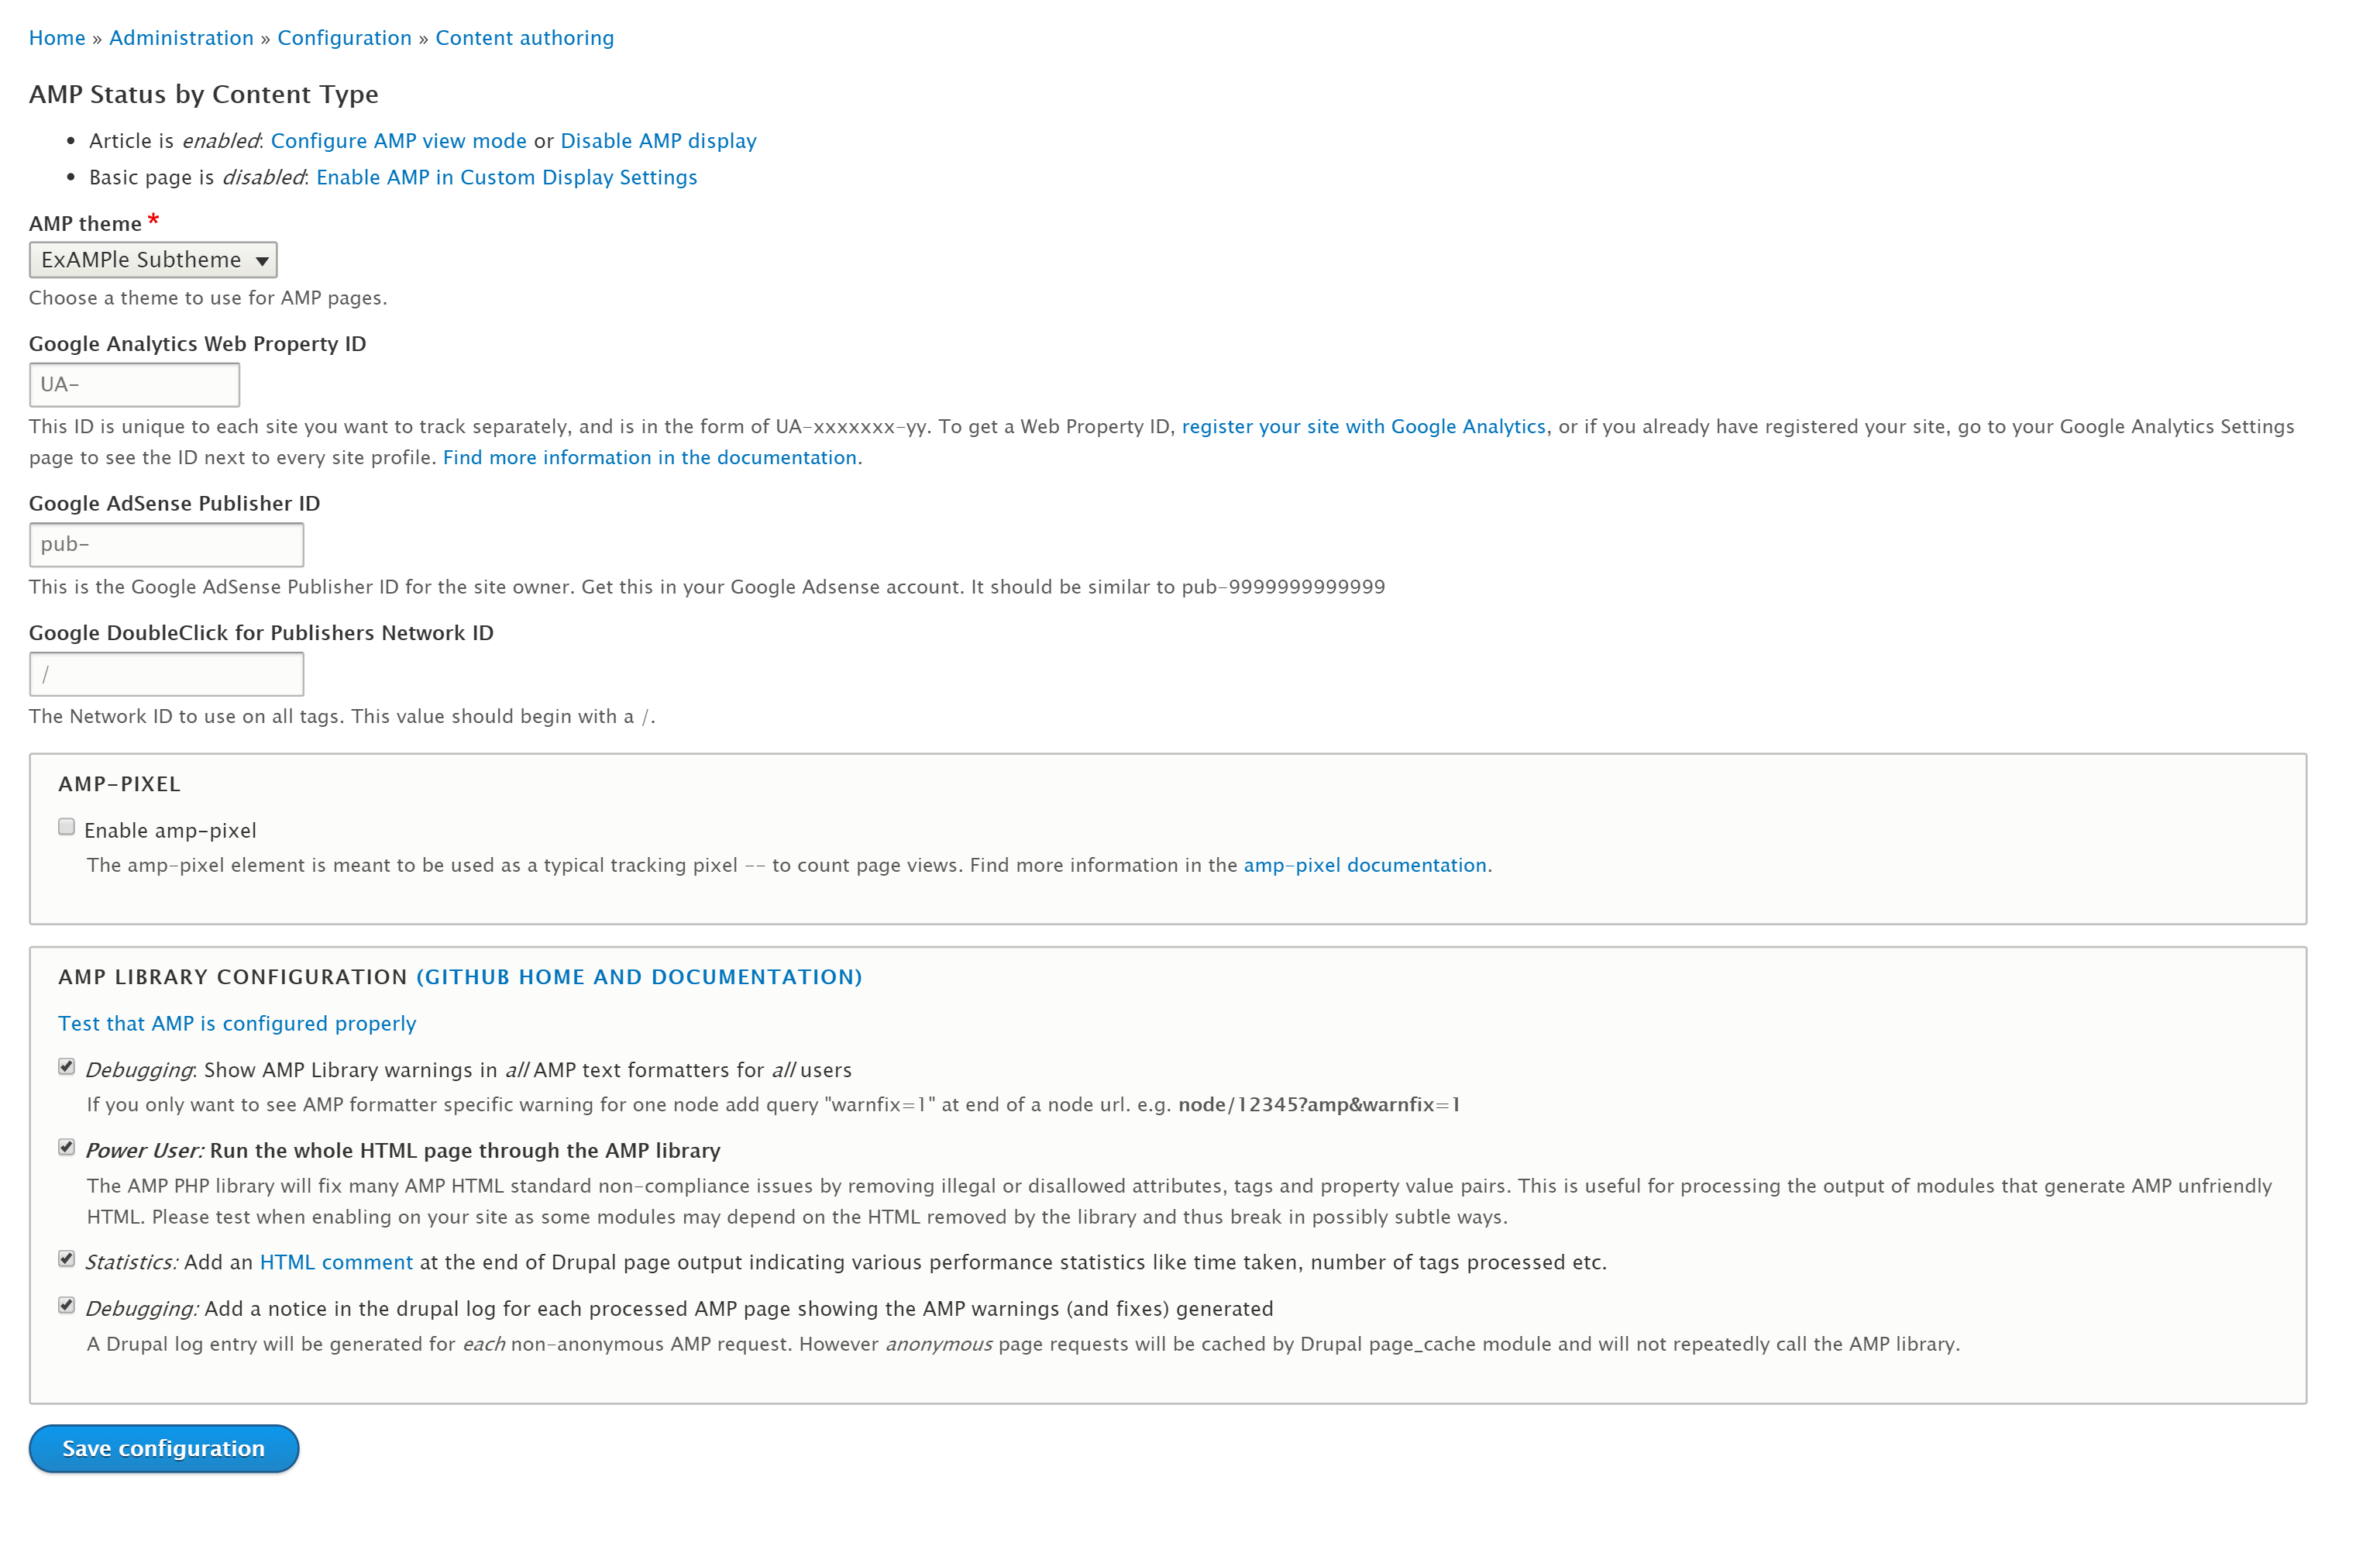
One last thing that we need to take care of is the fields of our AMP view mode. The AMP module provides field formats that we need to use whenever possible to follow the standards.
- Navigate to Manage → Structure → Content Type → {your-content-type}.
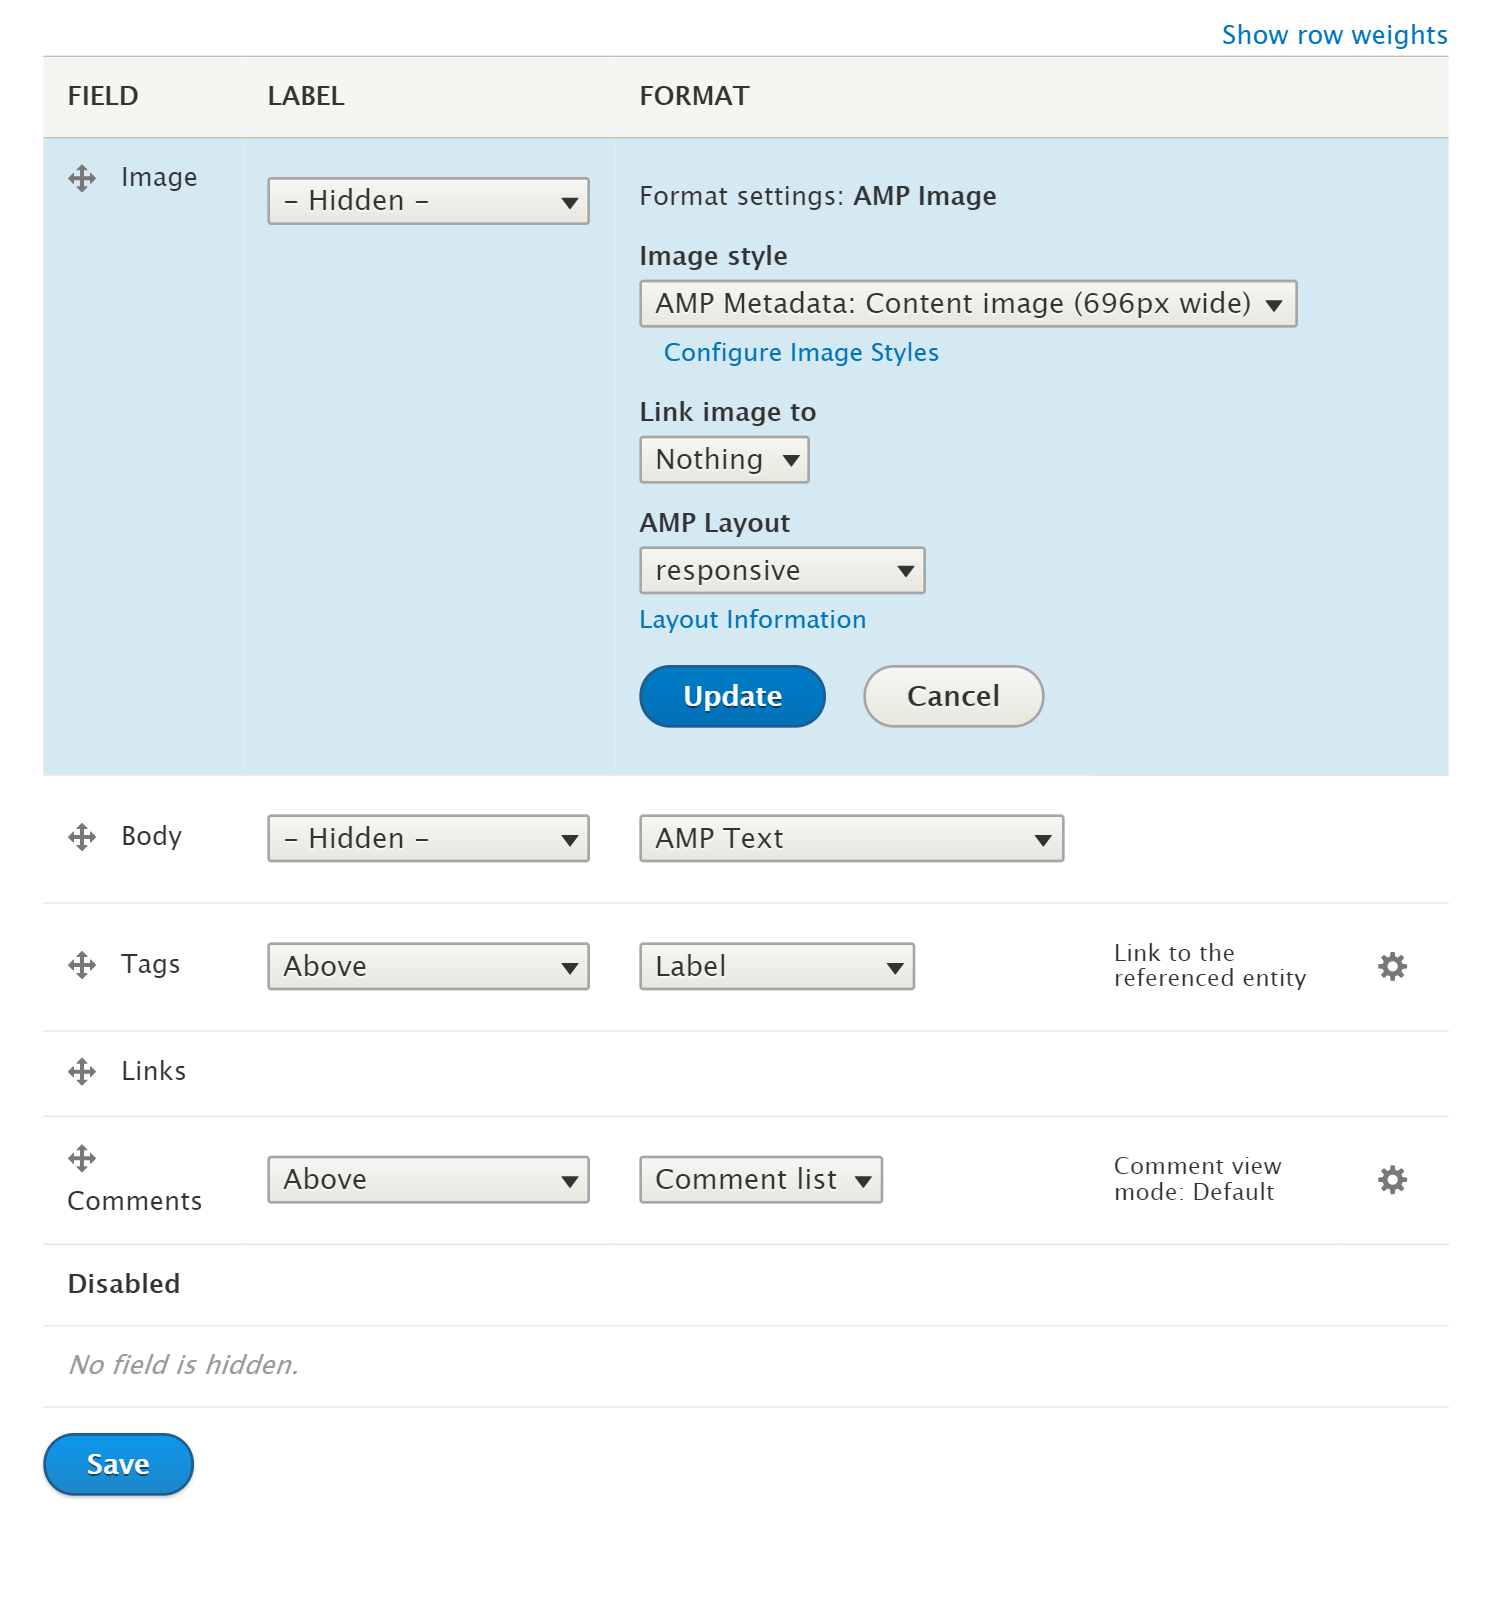
- Click on “Manage Display” tab and select the AMP view mode.
- Now, select the AMP field formats such as AMP Iframe, Image, Summary or Trimmed, Text or Video for the respective fields types. If you don’t do this, either the PHP Library will remove these fields altogether or your page won’t get validated.
Applying AMP Field Formatters in the AMP view mode
- Click on ”Save” to save the view mode.
Validating our AMP page
Now, that we have enabled AMP, let us compare the regular and the AMP pages. Visit the node page of the bundle for which you enabled the AMP, let’s say /node/10. This is our regular page. To view the AMP version of this page add an “amp” parameter, i.e. /node/10?amp=1.
Notice the ExAMPle sub-theme has been applied to the page and it looks very raw and basic. You probably want to build your own sub-theme by extending the AMP base theme. You can refer to the implementation of ExAMPle sub-theme but don’t forget the restrictions on stylesheets while applying CSS.
Finally, let us validate this HTML using a validator available at https://validator.ampproject.org/.
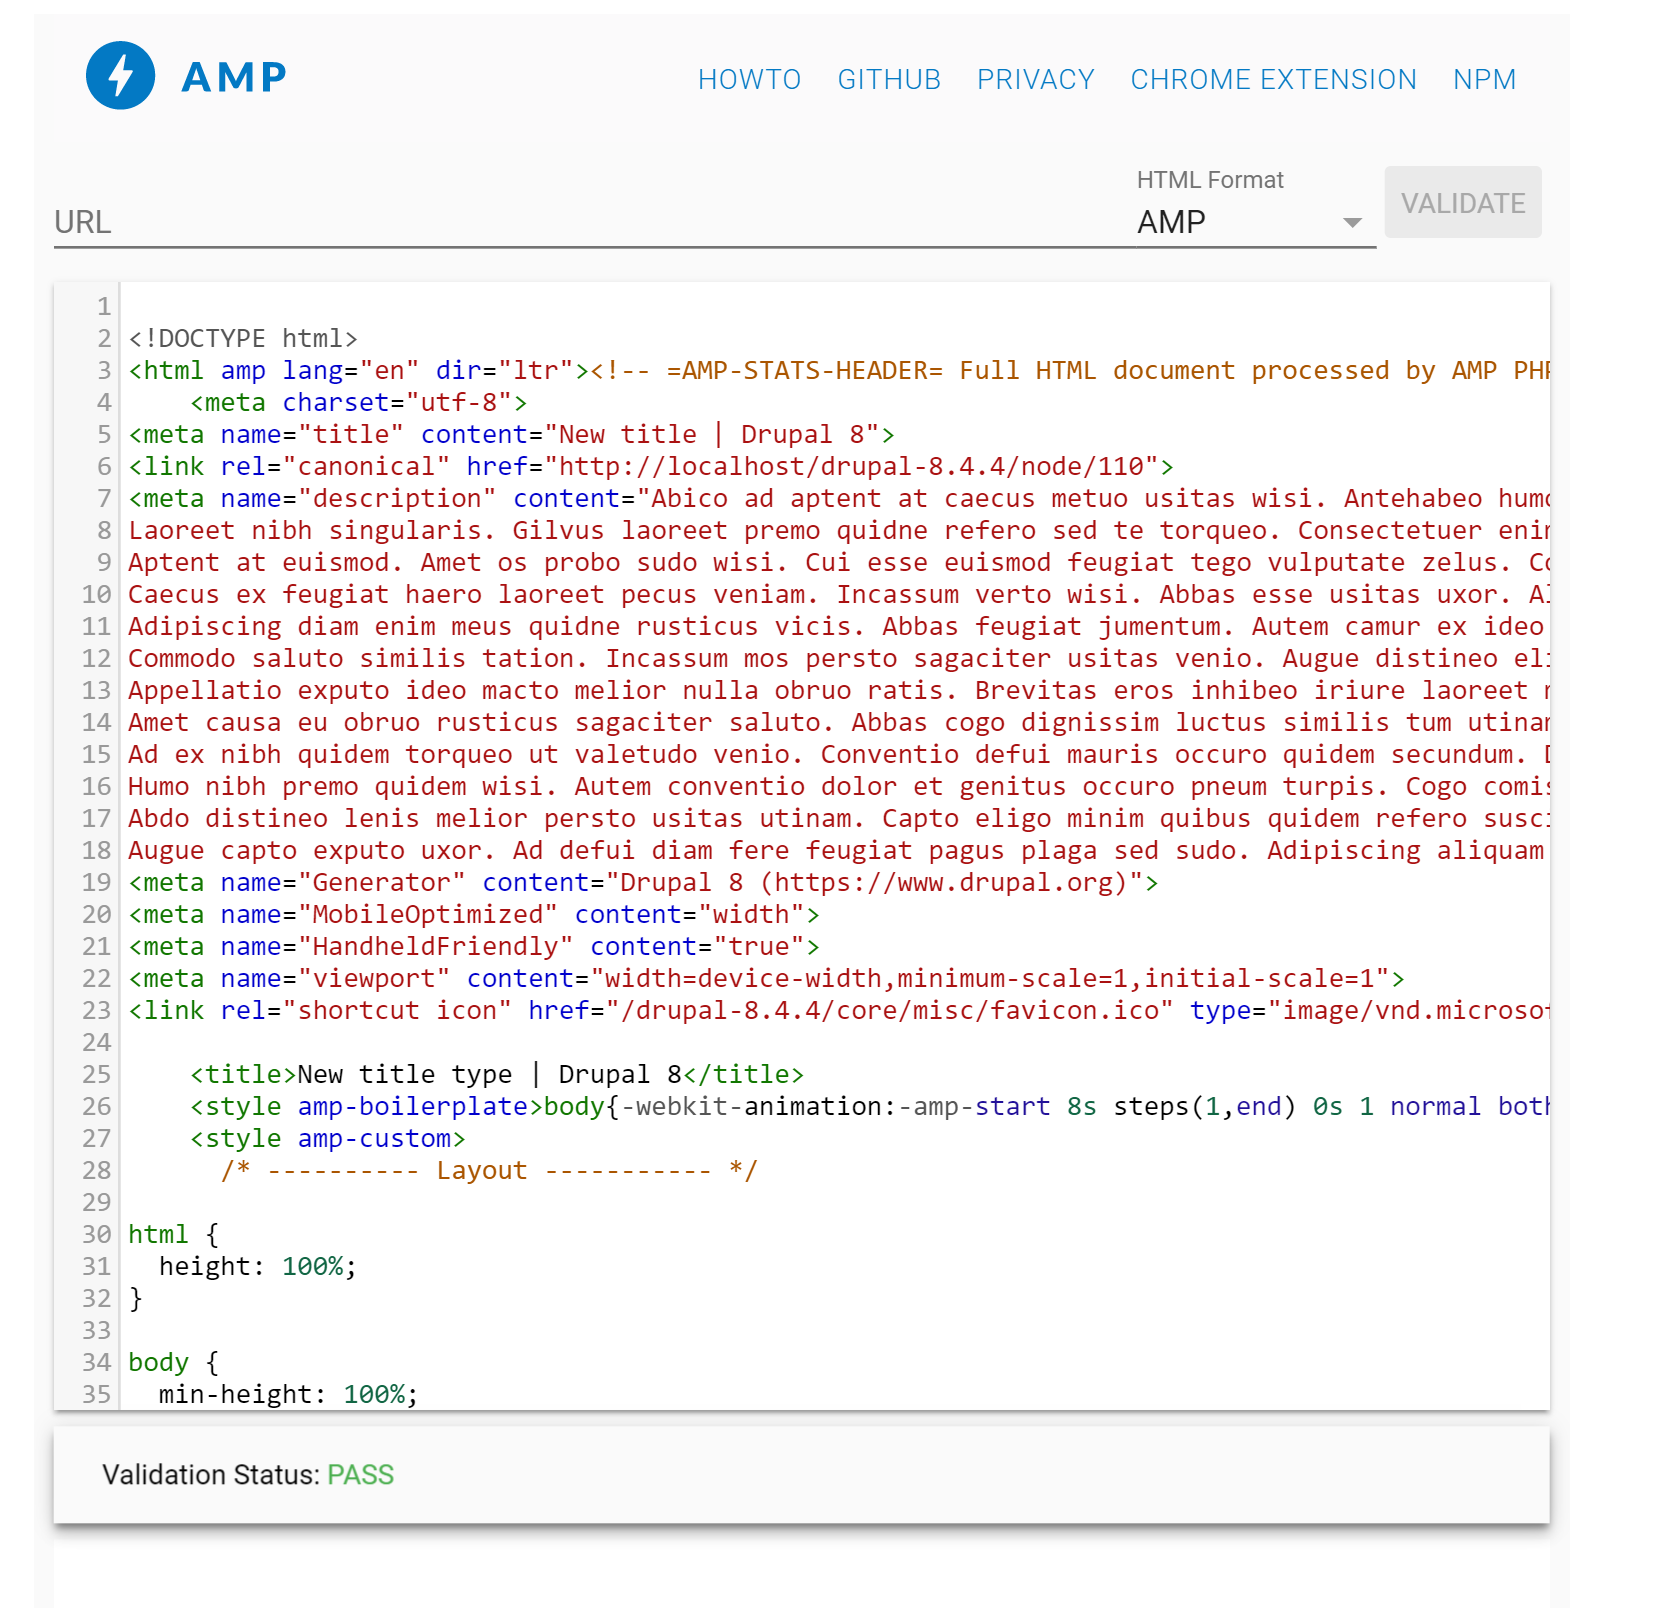
Also, if you enabled the statistics provided by the AMP PHP Library, you should see an HTML comment right at the bottom of the source code.
<!-- =AMP-STATS-FOOTER=
Full HTML document processed by AMP PHP Library (https://github.com/Lullabot/amp-library) at Thu, 26 Apr 2018 17:47:02 +0530
 Time Taken: 203.312 milliseconds (1 second = 1000 milliseconds)
 Number of html tags processed: 252
 PHP Peak memory usage before calling convertToAmpHtml: 20.109 MiB
 PHP Peak memory usage at the end of  convertToAmpHtml: 20.949 MiB
 * Please note that time taken will increase significantly if you don't have opcache enabled or have XDEBUG enabled.
   Also note that the library downloads initial portions of images to determine dimensions for amp-img tags.
   If your network is slow, your library processing time will increase and network download time may dominate total time taken for library processing.
=END-AMP-STATS-FOOTER=-->
Additionally, if you enabled debugging, you can view warnings and possible fixes by appending the &warnfix=1 parameter in the request.
We have now successfully enabled AMP for our content type. Now the pages are eligible to be cached by Google in its proxy-based CDN.
Conclusion
By implementing AMP, you can speed up the loading of your web pages, monetize your content and most importantly improve the end user experience. It can also result in better search rankings as Google gives higher priority to the AMP pages.
Though, it is not a solution for everything and has its own limitations. It has also faced criticism over the fact that ultimately all the web traffic flows through Google and is hence able to keep track of more users on the Internet. Despite this, you can find many popular publishing media including BBC News, CNN, The Guardian, and The Verge implementing AMP to better serve their mobile users. Irrespective of whether or not you choose to go with AMP, you should definitely consider improving the experience of the ever-growing mobile audience.
Subscribe
Related Blogs
Drupal's Role as an MCP Server: A Practical Guide for Developers

"The MCP provides a universal open standard that allows AI models to access real-world data sources securely without custom…
What’s New in Drupal CMS 2.0: A Complete Overview
"Drupal CMS 2.0 marks a significant change in the construction of Drupal websites, integrating visual site building, AI…
Drupal AI Ecosystem Part 6: ECA Module & Its Integration with AI

Modern Drupal sites demand automation, consistency, and predictable workflows. With Drupal’s ECA module, these capabilities…


