It's a confusing task for a front-end developer to select the base theme when building (a theme) from scratch. Even though we are spoiled by choices, it is not a tough call to opt for Bootstrap in the end. As a front-end developer, I prefer Bootstrap and Zurb foundation without any second thought. After all, with a market share of 57%, why should Bootstrap be a tough question? And since both Bootstrap and Zurb are easy to install and customize, there is no need to re-evaluate the choices.
In this tutorials, we will convert a basic layout into the Drupal theme using bootstrap as the base theme.
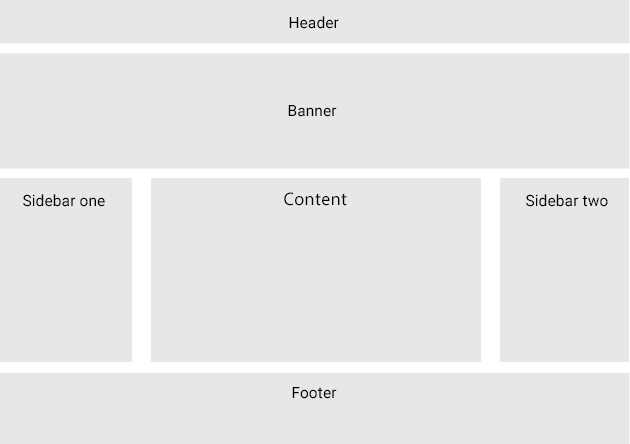
In this tutorials, we will create a custom sub-theme in a step-by-step tutorial.
Folder directory structure
First, we need to understand the theme folder structure. What files and subfolders required for a sub-theme. Below is the basic format.
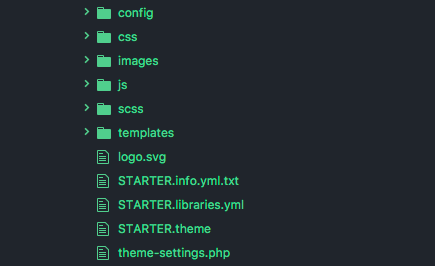
Before proceeding to create the custom theme, we must need an overview of most common files that you will find in a theme. Reference Drupal 8 Theme folder structure
- *.info.yml
This file is mandatory to define the theme. .info.yml files also define metadata, libraries, and block regions. This is the only required file in the theme.
- *.libraries.yml
The .libraries.yml file is used to define JavaScript and CSS libraries that can be loaded by the theme.
- *.breakpoints.yml
In this file, we define the points to fit different screen devices
- *.theme
This is the php file where we can write complex logic and conditions preprocessing of the variables before they are merged with markup inside the .html.twig file.
- CSS/
It is good practice to store .css files in the 'CSS' subfolder. Files must be defined in .libraries.yml file.
- js/
Theme-specific JavaScript files are stored in the 'js' folder. For a theme to load JavaScript files they must be defined in .libraries.yml file.
- images/
It is good practice to store images in the 'images' subfolder.
- screenshot.png
If a screenshot.png file is found in the theme folder, then it will be used on the Appearance page. Alternatively, you can define a screenshot in the .info.yml file.
- logo.svg
If an SVG vector file of your theme's logo is found in the theme folder, then it may be used in the header of the website. Logos can also be uploaded to Appearance > Settings
- templates/
In this folder, we will keep all the template files.
Steps to Create Your Custom Drupal Theme using Bootstrap
Download the bootstrap theme from Drupal.org and place it under your theme directory. Place it in contrib folder and create a custom theme folder names as THEMENAME in the same directory.
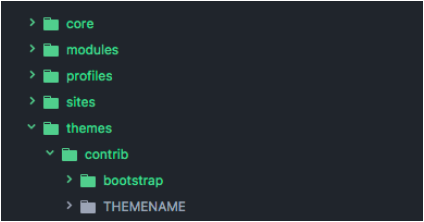
- Create your own sub-theme folder
--Theme
Css
Js
Images
Template
- Create the .info.yml file
Header, banner, content, sidebar_one,sidebar_two, footer have been included in the region section. This is to notify Drupal templating machine that your theme will have these regions.name: 'THEMENAME' description: 'A basic theme based on bootstrap 3.' package: 'Bootstrap' core: 8.x type: theme base theme: bootstrap regions: header: 'Header' banner: 'Banner' content: 'Content' sidebar_one: 'Sidebar One' sidebar_two: 'Sidebar Two' footer: 'Footer' libraries: - 'THEMENAME/global
However, defining them here is not enough. These regions still do not show up. You must also include them in the page.html.twig file.
- Define your libraries file
global: version: VERSION css: base: css/STARTER.css: {} js: js/STARTER.js: {} - Create theme regions
Page.html.twig, most important file that decide the layout and structure of your website.
Create page.html.twig
This file mainly consists of
1.Html markup 2.Regions 3.Variables -
Here we will be focusing on the layout which requires HTML markup and regions.
For the current layout displayed above and considering 12 columns layout of bootstrap, we need 6 sections for our layout.
Header
Banner
Sidebar one -- 3 columns
Content -- 6 columns
Sidebar Two -- 3 columns
FooterCreate Html markup
<div class=”container”>
<header id=”header”>

</header>
<section id=”banner”>

</section>
<aside id=”sidebar-one” class=”col-xs-12 col-sm-12 col-md-3””>
</aside>
<section id=”main-content” class=”col-xs-12 col-sm-12 col-md-6”>
</section>
<aside id=”sidebar-two” class=”col-xs-12 col-sm-12 col-md-3”>
</aside>
<footer>
</footer>
</div>
Here, our Html markup is ready according to above layout. Now, We need to place the region, defined in .info.yml file.
Let's add region in every section one by one.
Header
<header id=”header”>
{{ page.header  }}
</header>
Banner
<section id=”banner”>
    {{ page.banner  }}
</section>
Sidebar one
{ % if page.sidebar_one % }
<aside id=”sidebar-one” class=”col-xs-12 col-sm-12 col-md-3”>
    {{ page.sidebar_one }}
</aside>
{ % endif % }
Content
{ % if page.content % }
<section id=”main-content” class=”col-xs-12 col-sm-12 col-md-6”>
    {{ page.content }}
</section>
{ % endif % }
Sidebar two
{ % if page.sidebar_one % }
<aside id=”sidebar-two” class=”col-xs-12 col-sm-12 col-md-3”>
    {{ page.sidebar_two }}
</aside>
{ % endif % }
Footer
<footer>
    {{ page.footer }}
</footer>
Placing all section in one place, page.html.twig file code will look like this:
<div class=”container”>
<header id=”header”>
{{ page.header  }}
</header>

<section id=”banner”>
    {{ page.banner  }}
</section>

{ % if page.sidebar_one % }
<aside id=”sidebar-one” class=”col-xs-12 col-sm-12 col-md-3”>
    {{ page.sidebar_one }}
</aside>
{ % endif % }

{ % if page.content % }
<section id=”main-content” class=”col-xs-12 col-sm-12 col-md-6”>
    {{ page.content }}
</section>
{ % endif % }

{ % if page.sidebar_one % }
<aside id=”sidebar-two” class=”col-xs-12 col-sm-12 col-md-3”>
    {{ page.sidebar_two }}
</aside>
{ % endif % }
<footer>
    {{ page.footer }}
</footer>
</div>
Your custom theme is now ready. Let’s create some content and place them to fill the layout accordingly.
For this, we need to first enable the theme.
> Go to admin/ appearance and enable your theme by default.Now, define and place blocks for respective regions.
> Go to admin/structure/blockHeader
Logo
Navigation
Banner
Hero Image
SIdebar one
Login block
Content
Your post content
Sidebar two
Search Form
Footer
Powered by DrupalOutput page layout
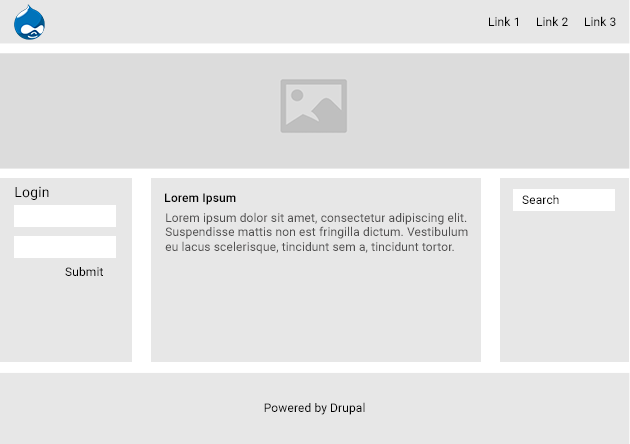
- Create your logo and screenshot
By default, the Drupal logo will appear on your site. To change your logo you need to create one and manage through /admin/structure/block/manage/sitebranding
Here, you can also manage Site name and Site slogan.
Add your screenshot as shown in the folder structure. This will be displayed at admin/appearance.
Here, we are done with the custom theme creation, theme configuration, and block placements.
Now you can show your frontend skill to beautify your template as cool as you want and see the result.
Subscribe
Related Blogs
What’s New in Drupal CMS 2.0: A Complete Overview

"Drupal CMS 2.0 marks a significant change in the construction of Drupal websites, integrating visual site building, AI…
Drupal AI Ecosystem Part 6: ECA Module & Its Integration with AI

Modern Drupal sites demand automation, consistency, and predictable workflows. With Drupal’s ECA module, these capabilities…
Inside the Drupal AI Summit: Themes, Speaker and What To Expect

“ The web is changing fast, and AI is rewriting the rules. It writes content, builds pages, and answers questions directly,…


