Vue JS is a progressive javascript framework for building interactive web interfaces which are approachable, versatile & performant. It provides data-reactive components with a simple and flexible API.
If you are already familiar with the basics of Vue.js and Drupal 8 but feel that the world of SPA or headless Drupal is scary, this tutorial is for you.
What will we build?
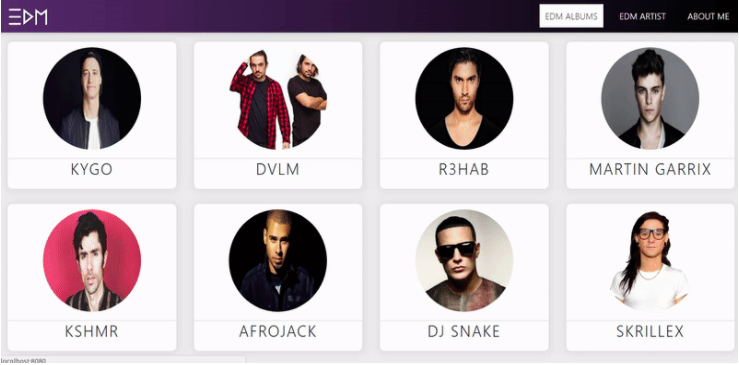
Let’s have a quick look what we would be building. Here we will be developing a headless Drupal site called EDMAPP that interacts with Drupal using REST API.
Getting started with Drupal 8
Once you have installed the Drupal 8 on your local system you are good to go to create custom contents type. You can add views, enable and work with REST API. To get started the first login with the admin credentials on your Drupal site, and just follow the steps below. If you already know how to set up views, content types, REST API you can skip and move to the next step.
If you have installed Drupal 8 on your local system, you can create custom content types, add views, enable and work with REST API
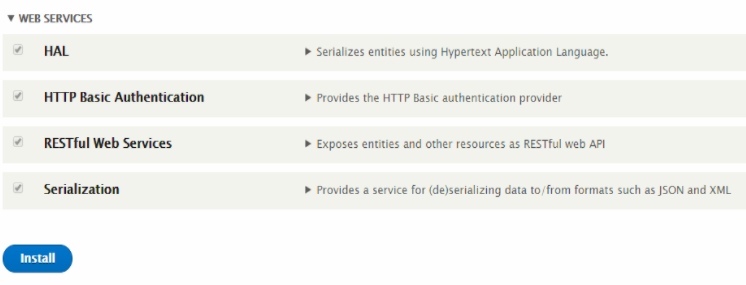
Step 1: Enabling REST API on Drupal
Log in to your Drupal 8 website. Extend → Enable these modules → Install them.
Step 2: Creating Custom Content type
Create two custom content types called “EDM Album” and "Artist" filling in the relevant fields.
For EDM Album
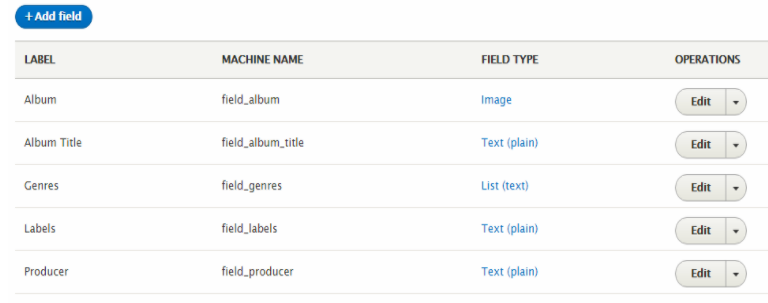
For EDM Artist

Step 3: Adding View and working with REST
Once you have finished adding data to your custom content types, create the view.
Structure → Views → Add view
And you will get a form as shown in the image below.

Name the view. Leave all the settings as it is and check provide a REST export and add REST export path to it, for example, api/edmalbum will be our URL to get the response data.
Once done, your screen will appear something like the image below. Apply a filter criteria to filter out relevant information to it. For this click on add (filter criteria) → content type → check and select content type EDM albums.

Do the same for the 'artist'. Create a view and filter out the relevant data. Now shift the focus to setting up vue js.
Apply filter criteria, check and select content types EDM albums. Do the same for artist
Getting started with Vue JS
In this section, we will create the front end with Vue js and create single page application.
Before proceeding further, your system must have node js installed. If not, you can follow this link and grab your node js installation according to your system's need.
Step 1: Setting up Vue project with vue CLI
We will use the Vue CLI to speed up the process. If you do not have the Vue CLI installed, we can install it by doing the following.
npm install -g vue-cli
Note: For the purpose of this tutorial, while running the command below, I chose 'NO' when asked for code listing.
To create the project, run the following command. Keep entering the asked information accordingly and run the app.
vue init webpack <name_of_project folder>
# install dependencies and go!
cd <name_of_project folder>
//install node dependencies from package json
npm install
// run this command to start your project
npm run dev
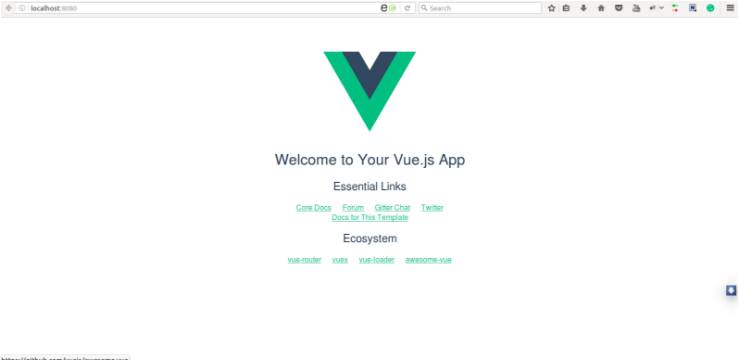
After running the above commands, if we go to localhost:8080, we should see this:
Step 2: Adding Vue Router and Vue Resource to our project
Now we are ready to start our single page application. However, we have one more dependency to install, named vue-router and vue-resource.
vue-router is the official router for Vue.js. It deeply integrates with Vue.js core to make building Single Page Applications with Vue.js.
If you have knowledge of angular and react you must be aware that the Vue-router is synonymous with the angular router or react-router.
Vue resource is the plugin for Vue.js which provides services for making web requests and handle responses using an XMLHttpRequest or JSONP.
To install these two dependencies to your project, run the following commands in your terminal or cmd.
//install vue-router and save dependency to package.json
npm install vue-router --save
//install vue-resource and save dependency to package.json
npm install vue-resource --save
STEP 3: Let's cook some code
The structure should, now, look something like the image below. You can also clone or fork the project from GitHub.
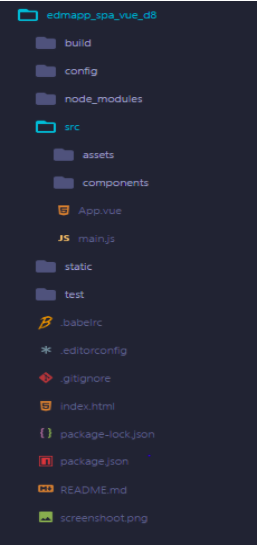
STEP 3.1: Modifying main.js file to use Vue routers and Vue Resources
Open your project on your favorite text editor and head over to the src/main.js to configure your project for with Vue router and Vue resource.
Copy and replace the code below in your main.js file
//import the vue instance
import Vue from 'vue'
//import the App component
import App from './App'
//import the vue router
import VueRouter from 'vue-router'
//import the vue resource
import VueResource from 'vue-resource'
//tell vue to use the router
Vue.use(VueRouter)
//tell vue to use the resource
Vue.use(VueResource);

//importing components for the routers
import Album from './components/Album'
import Artist from './components/Artist'

//define your routes
const routes = [

    {
        path: '/',
        component: Album,

    }, {
        path: '/artist',
        component: Artist
    }
]

// Create the router instance and pass the `routes` option

const router = new VueRouter({
    routes, // short for routes: routes
    mode: 'history'
})


//instatinat the vue instance

new Vue({
    //define the selector for the root component
    el: '#app',
    //pass the template to the root component
    template: '<App/>',
    //declare components that the root component can access
    components: {
        App
    },
     //pass in the router to the Vue instance
    router

}).$mount('#app') //mount the router on the app
We imported the Vue class from node modules, then imported the App component.
The App.vue component is the default component created by the Vue CLI. We, however, imported it to use it as our root component. After this, we then import the Vue router and then inform the Vue class so it can use the Vue router by using vue.use(vueRouter).
In the next line, we import the Vue resource and inform the Vue class that it can use the Vue resource by doing vue.use(vueResource).
We further define a 'constant' called routes which are an array containing the path for our component. Next, we create our router. An instance of the Vue router, which we pass in two parameters.
The first parameter is the routes array and the other one is the mode. The mode parameter, however, was passed so as to prevent our URLs from having the #sign in them, which has also proven not to be good for SEO when URLs have the ' # ' in them.
After all of this, we create a new Vue instance, in which we pass in the details of our root component, as well as declare the mounting point of the router. Once you have completed the steps, the screen will go blank since the Vue isn't updated where to load components. Here we will use <router-view></router-view> tags.
Now open your src/App.vue file and replace it with the following content:
STEP 3.2: Modifying App.js to work with the router
<template>
<div id="app">
  <nav class="navbar  fixed-top navbar-expand-lg justify-content-between">
    <a class="navbar-brand" href="#"><img src="./assets/logo.png" alt=" EDM LOGO"></a>
    <button class="navbar-toggler" type="button" data-toggle="collapse" data-target="#navbarSupportedContent" aria-controls="navbarSupportedContent" aria-expanded="false" aria-label="Toggle navigation">
    <span class="navbar-toggler-icon"></span>
    </button>
    <div class="collapse navbar-collapse " id="navbarSupportedContent">
      <ul class="nav ml-auto navbar-nav">
        <li class="nav-item active">
          <router-link v-bind:to="'/'">Edm albums</router-link>
        </li>
        <li class="nav-item">
          <router-link v-bind:to="'/artist'">edm artist</router-link>
        </li>
        <li class="nav-item">
          <router-link v-bind:to="'/about'">about me</router-link>
        </li>
      </ul>
    </div>
  </nav>
//router view tags to load components into the router
  <router-view ></router-view>
</div>
</template>
<script>
export default {
name: 'app'
}
</script>
<!-- styling for the component -->
<style type="text/css">
@import url('./assets/style.css');
</style>
If we look at the above code, we have added <router-view ></router-view> to load components to the router view. We also import style.css to add custom styling to our app.
Step 3.3: Setting Up App Components And Routers
Create two app components Album.vue and Artist.vue. Here the 'Album' component will be out default component to loads into the view.
Before adding other components let's add Bootstrap to our index.html file. Open index.html file from your root of the project and add the files. Or just copy and replace the code given below.
<!DOCTYPE html>
<html>
    <head>
        <meta charset="utf-8" />
        <meta http-equiv="X-UA-Compatible" content="IE=edge">
        <title>Edm App</title>
        <meta name="viewport" content="width=device-width, initial-scale=1">
        <link rel="stylesheet" href="https://maxcdn.bootstrapcdn.com/bootstrap/4.0.0/css/bootstrap.min.css">
        <link rel="stylesheet" type="text/css" href="./css/style.css">
    </head>
    <body>
        <div class="container-fluid">
            <br>
            <div id="app">
            </div>
        </div>
        <script type="text/javascript" src="https://cdnjs.cloudflare.com/ajax/libs/jquery/3.3.1/jquery.min.js"></script>
        <script type="text/javascript" src="https://maxcdn.bootstrapcdn.com/bootstrap/4.0.0/js/bootstrap.min.js"></script>
    </body>
</html>
Now we need to create components for our app that will be loading into our route. So just head over to src folder and create a file called Album.vue and Artist.vue and add the add the following code to it.
Album.vue
<template >
<div  id="albums">
    <div class="row">
        <div class="col-md-3 col-sm-12"  v-for="album in albums">
            <div class="card">
                <img class="card-img-top album_img " v-bind:src="album.field_album_cover[0].url" v-bind:alt="album.field_album_cover[0].alt" style=";height: 200px;" >
                <div class="card-body">
                    <h5 class="card-title album_title">  {{ album.title[0].value }} </h5>
                    <div class="card-text">
                        <p>
                            <strong>Artist :</strong>
                            <span>{{ album.field_artist[0].value }}</span>
                        </p>
                        <p>
                            <strong>Genres :</strong>
                            <span v-for ="genre in  album.field_genres ">
                                {{ genre.value }}
                            </span>
                        </p>
                        <p>
                            <strong>Labels :</strong>
                            <span>{{album.field_label[0].value}}</span>
                            <span v-for ="label in  album.field_labels ">
                                {{ label.value }}
                            </span>
                        </p>
                    </div>
                </div>
            </div>
            <br>
        </div>
    </div>
</div>
</template>

<script>
export default {
    name: 'albums',
    //initializing data to be load into the component
    data() {
        return {
            albums: [],
            albums: this.getAlbums()
        }
    },
    methods: {
        //sending request ot get promise from the hitting URL
        getAlbums: function() {
            this.$http.get("http://edm.dd:8083/api/album").then(response => {
                this.albums = response.body;
                // console.log(this.albums);
            }, response => {
                console.log("Error fetching data from URL make sure your server up running");
            });
        }
    }
};
</script>
Don’t get confused with export default it is part of the ES6 module system. It is used to export functions, objects, classes or expressions from script files or modules.
The data() function which contains array will receive data form method called getAlbum
The method getAlbum in album.vue and getArtist in artist.vue will get us a response form $http request, that will be made by vue resource, by hitting the URL that we have defined in Drupal 8 site for REST Export. The function here will return a promise and get the JSON response from the URL given.
Once the promise returns successfully, we have our data in albums and artists array of object that can be used in our template to display all the pieces of information that we want to print.
For displaying the data (from the object), we have used list rendering in Vue js. that work similarly, the way ng-repeat works in angular. For more details, you can follow this link.
Note: If you get 'Access-Control-Allow-Origin' error in the console of your browser, then you can download this extension in google chrome browser.
Failed to load http://edm.dd:8083/api/album: No 'Access-Control-Allow-Origin' header is present on the requested resource. Origin 'http://localhost:8080' is therefore not allowed access.
Congratulation, You have created your own Headless Single Page Application with Vue JS and Drupal 8.
What next?
You can increase the level of complexity by adding more Routes and components. Or by adding, editing the Drupal content from the frontend.
If you have any doubts feel free to ask in the comment section below. Or connect with us to build awesome SPAs and projects. Drop a mail at [email protected].
Subscribe
Related Blogs
Drupal's Role as an MCP Server: A Practical Guide for Developers

"The MCP provides a universal open standard that allows AI models to access real-world data sources securely without custom…
What’s New in Drupal CMS 2.0: A Complete Overview
"Drupal CMS 2.0 marks a significant change in the construction of Drupal websites, integrating visual site building, AI…
Drupal AI Ecosystem Part 6: ECA Module & Its Integration with AI

Modern Drupal sites demand automation, consistency, and predictable workflows. With Drupal’s ECA module, these capabilities…


