If you are a typical internet user you must have come across Captchas, at least once in your lifetime, which asks you to prove your credibility as a human by typing bizarre looking sequence of characters or sometimes asks you to solve simple mathematical problems (as simple as 1 + 2).
They are annoying, aren’t they? Thwarting you from accessing the content. Quite the irony, which it is, their purpose is contrary to what we reckon about them.
Purpose of Captchas
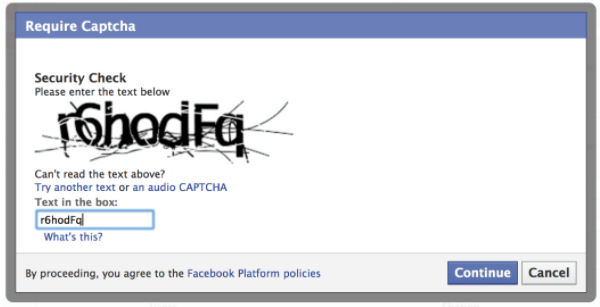
Captchas are used to fight against spam bots. Spambots are used by people with a specific goal in mind, it might be to promote their site or product by spamming on your blog to improve the SEO of their site or, they just want to annoy you. It is inarguably wrong. Spambots don’t have a brain of their own they can’t identify patterns or strings nor they can solve simple mathematical problems. So, we use CAPTCHA to brick spam bots at the door, that being said, this is changing quickly with the rise of machine learning to identify patterns and strings in the image or by writing bots that are smart enough to solve the mathematical problems.
Honeypot To The Rescue
 We can use Honeypot as our second line of defense, it is a method in which we inculcate a fake input field into the form that isn’t visible to us humans interacting with the foreground, it is only visible to the bots. “how is that even possible?” you might ask? It is no black magic, bots parse the HTML of a page to identify the field of the form or a comment box.
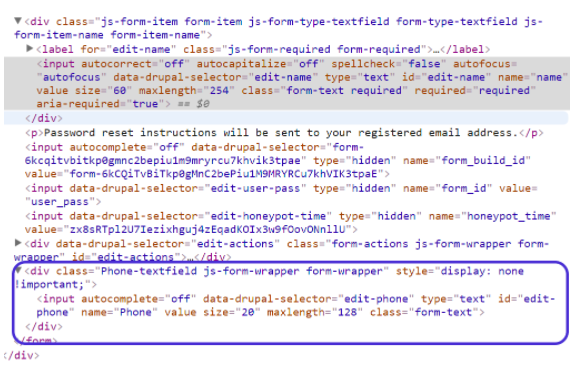
Honeypot module creates a field or element that is virtually invisible by setting it’s CSS property “visibility: hidden” or “display: none” it is virtually invisible, if the field is filled, it is safe to assume that it’s a bot since humans can’t see it and we can reject the form or the comment. It also sets the timestamps.
If all this sounds intimidating to implement, worry not, Drupal has security modules to do all the heavy lifting for you, all you have to do is install them.
Of course, manually implementing them is also possible. In this article, we’ll go with installing and configuring these modules in your Drupal site, because why working hard and building something from scratch when you can install them for free and in no time.
We are going to install two modules, unsurprisingly they are called Captcha and Honeypot.
Installing Captcha Module
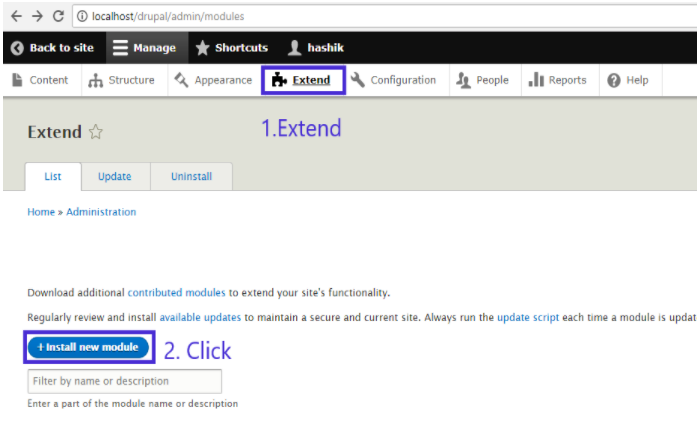
Step 1: Go to this link, scroll down, and download the Captcha module. Once you have downloaded it, go back to your Drupal site and click on 'Extend' and 'Install new module'.
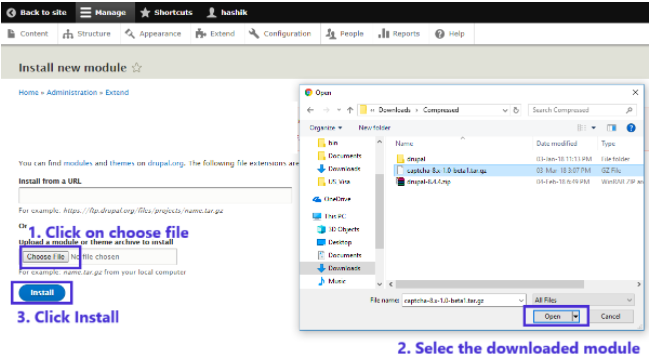
Step 2: Click on 'Choose File' to navigate to the place where you downloaded the module. Once there select it and click on 'Open' and 'Install'.
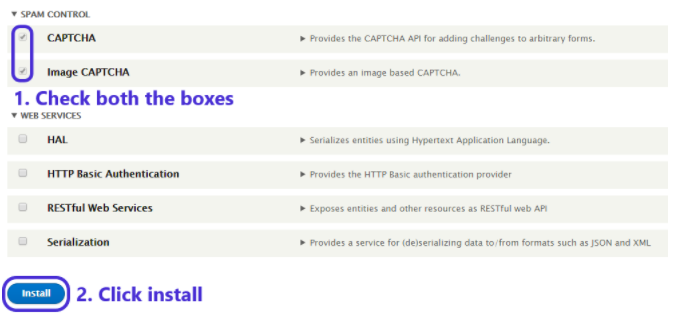
Step 3: Since the module has been added we only need to install it. Go to 'Extend' check the box for CAPTCHA, Image CAPTCHA and click on 'Install'.
Step 4: Once you have installed it, go to extend, scroll down to CAPTCHA, select it and click on 'Configure'.

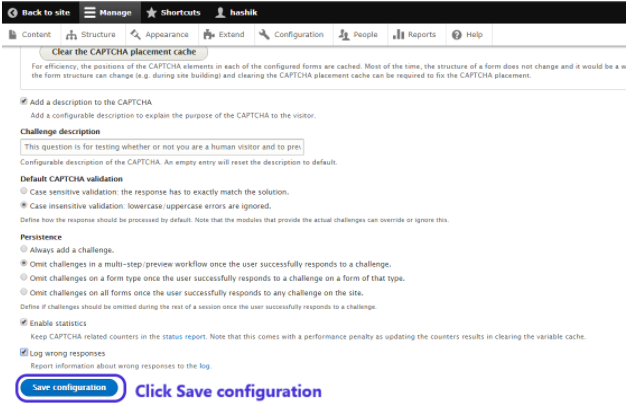
Step 5: Select your suitable configuration, since all the fields are self-explanatory with documentation/hints written on them. After selection click on 'Save Configuration' to save the changes.
Step 6: Go to CAPTCHA Points to enable Captcha for the forms you desire.
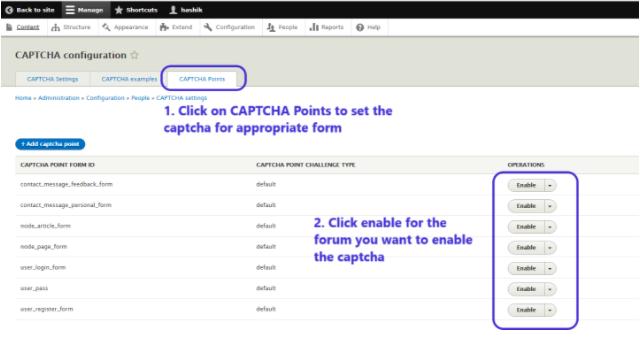
For instance, you want to enable Captcha for the log-in form (as shown in the picture above), click 'Enable' and Captcha will be the important checkpoint to visit the website.
Installing the Honeypot Module
Now, it’s time to install our second line of defense, the Honeypot module.
Step 1: Go to this link, scroll down, and download the Honeypot module. Installing modules in Drupal is almost similar for all.
Extend > Install new module > Choose File > Select the downloaded module > Open > Install.
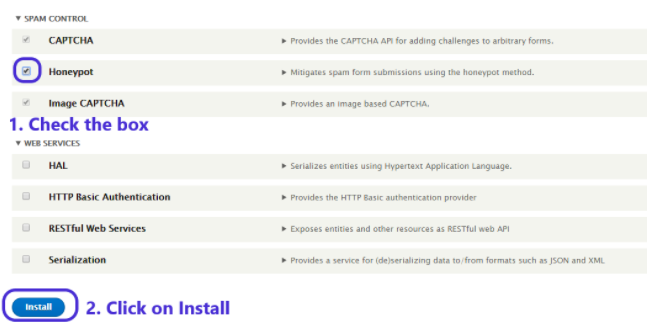
Step 2: To install the module, navigate to Extend, scroll down and find Honeypot check the box and click on Install.
Step 3: Go to extend, scroll down, and select Honeypot. Click on Configure to configure the honeypot settings.

Step 4: Set the field name you want to use as the honeypot. As a matter of caution don’t make it too obvious by using the phrases such as "Spam Detector". Set the time stamp, that is the minimum time span between which the user should wait to submit another form. Select the rest of the fields appropriately, the hints of which are given below them.

Step 5: Select the forms that you want the honeypot to enable and click on 'Save the Configuration'.
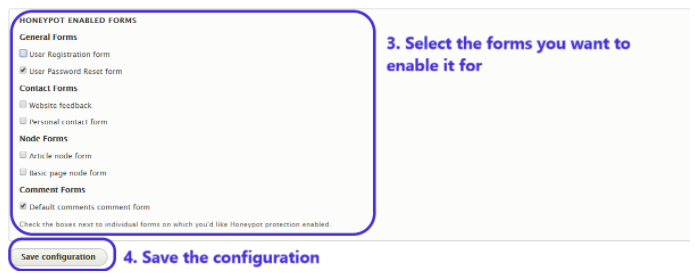
Step 6: As you enable it to add Password Reset forum. You could see the timestamp working.
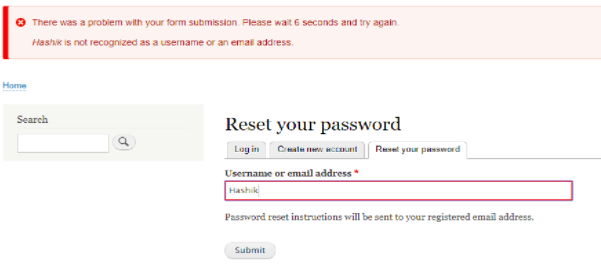
At this point, you will realize that there is only one input box in the foreground, but when we look at the HTML code, we notice another text input element with name = “Phone” and CSS property “display: none”, as explained at the start. This, only bots can see and not a human user.
Now that you have enabled the module, you can stay away from those annoying spammers and their bots. Since technologies like machine learning are evolving, the bots are getting smarter and so should our tricks to brick them.
In case of any query, don't forget to comment below.
Subscribe
Related Blogs
Drupal's Role as an MCP Server: A Practical Guide for Developers

"The MCP provides a universal open standard that allows AI models to access real-world data sources securely without custom…
What’s New in Drupal CMS 2.0: A Complete Overview
"Drupal CMS 2.0 marks a significant change in the construction of Drupal websites, integrating visual site building, AI…
Drupal AI Ecosystem Part 6: ECA Module & Its Integration with AI

Modern Drupal sites demand automation, consistency, and predictable workflows. With Drupal’s ECA module, these capabilities…


