Drupal is designed to endure bulk traffic but, even it can fail if the number rises to a hundred thousand. Learn to configure Varnish with Drupal.
Peak traffic can result in exhaustive to-and-fro of data from the server to the computer which can eventually wear-out the server. This extensive process makes it hard for the server to adapt to growing numbers of viewers visiting the site at the real-time.
Since every visitor needs a significant amount of attention what if, at this point, your website forgets to load after reaching the pinnacle it can serve?
In case your website isn’t prepared to handle the numbers and you are only relying on ‘good architecture’ of Drupal, you are putting your reputation at stake as your visitors wait for your website to load.
Even The Best Samurai Needs An Armor
While the number of articles praising Drupal for its performance is enormous, the comparison is rarely with a website with huge traffic. We all know how Drupal is designed to endure bulk of traffic but, even Drupal can fail you if the number rises to a hundred thousand, without Varnish.
There are numerous approaches to overcome the performance issues, but nothing beats the experience after configuring Varnish with your server.
Varnish assists with scaling, by including additional software which helps disperse the bottleneck. Information and pages can be stored in it. In case a request is made for the stored information the request is handled by Varnish and not browser.
Simply put, the information is cached in Varnish to decrease response time and the load on the server.
Varnish-Cache claims to boost website performance by 300X to 1000X
Let's setup Varnish-cache with one Drupal 8 website to improve its performance. Prerequisites needed:
- Ubuntu 16.04
- LEMP stack for running Drupal 8
Configure Varnish
- Installation of Varnish Cache.
Enter the commands to install Varnish.
sudo apt-get update sudo apt-get install varnish - The configuration of Varnish Cache.
vim /etc/default/varnish
Here, you have to replace the following code snippet
DAEMON _OPTS="-a :6081\
  	-T localhost:6082
  	-f /etc/varnish/default.vcl
  	-s malloc,256m"
  	-S /etc/varnish/secret
With
DAEMON _OPTS="-a :80\
  	-T localhost:6082
  	-f /etc/varnish/default.vcl
  	-s malloc,512m"
  	-S /etc/varnish/secret
Here, I have set Varnish to listen on port 80 and increase the memory allocated to 512MB from 256MB.
Copy default varnish.service file to system folder to use Varnish as a service.
cp /lib/systemd/system/varnish.service /etc/systemd/system/
Again you have to change default port to 80 and save it. You can do it by replacing
ExecStart=/usr/sbin/varnishd -a :8080
-T localhost:6082 -f /etc/varnish/default.vcl
-S /etc/varnish/secret -s malloc,256m
With
ExecStart=/usr/sbin/varnishd -a :80
-T localhost:6082 -f /etc/varnish/default.vcl
-S /etc/varnish/secret -s malloc,256m
Save the file and start editing /etc/varnish/default.vcl.
vim /etc/varnish/default.vcl
In case you are not aware of VCL [Varnish Configuration Language] file it allows developers to set rules defining which data to cache, or from where to cache [anonymous users or authenticated user].
Developers can add restrictions to some of the pages, define cookies to cache data for an authenticated user, configure backend pooling. This acts as an interface to interact with Varnish.
We will only focus on important changes to provide backend server to the Varnish.
Set your backend server like this:
backend default {
       .host = “127.0.0.1”;
       .port = “8080”;
}
This ensures that Varnish will run on port 80 and our web server will run or port 8080. Once everything has been saved you have to restart Varnish service, load daemon tools again.
This can be done in following ways.
 /etc/init.d/varnish stop
 systemctl daemon-reload
 /etc/init.d/varnish start
Once you have setup and restarted Varnish, you need to change default port of Nginx to 8080 instead of 80.
Go to
/etc/nginx/sites-enabled/{your website conf} and edit the listen parameter in server block.
 listen 8080;
 listen [::]:8080;
Restart the nginx server:
Service nginx restart
Now if you open your website from a browser, content will actually be served by Varnish and not nginx. To verify that you can :
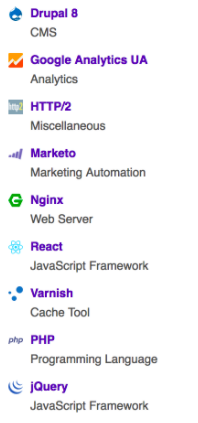
Install Wappalyzer and check if varnish was detected in caching tools.

Check headers of the website and look for Via or Varnish tags values.
You might notice that for the first time Varnish tag shows “MISS” status and if you hit your website again status changes to “HIT” and Via: Varnish.
This happens because there isn’t anything cached content in the first request and content was served by the web server.
Varnish With Drupal
For the optimal use of Varnish with Drupal 8, it is best to serve cache tags with the help of Varnish. Although it has the ability to cache every information, caching the tags from the Drupal cache will also work. Follow the instructions below:
- Download and install Purge module for Drupal 8.
- Download and install Generic HTTP purge module for Drupal 8.
As per official documentation “The purge module facilitates cleaning external caching systems, reverse proxies and CDNs as content actually changes. This allows external caching layers to keep unchanged content cached infinitely, making content delivery more efficient, resilient and better guarded against traffic spikes.”
Follow the steps to install and configure the above-mentioned modules.
- Install Purge module along with submodules such as Purge Drush, Purge Tokens, Purge UI, Cron Processor, Late runtime processor and core tags queuer. Also, enable Generic HTTP Purger and Generic HTTP Tags Header.
- Go Admin -> Configuration -> Development -> Performance -> Purge. (admin/config/development/performance/purge).
- Click on Add Purger and select type ‘HTTP Purger’.
- Purger will be added to a random hash code. From the tooltip button select ‘Configure’.
- Provide a name to the purger lets say ‘Varnish Cache’.
- In the request, tab provide configuration for the Varnish i.e IP address, port and Request method. I am running it on the same server so I have selected ‘localhost’ and port 80. The request method is ‘BAN’.
- Now go to headers tab and add the following header (Header and Value)
Purge-Cache-Tags : [invalidation:expression
- Once you have set all the settings related to Purge and Generic Purge Header, Now you have to set other performance settings such as CSS and JS Aggregation, ‘page cache maximum age’ from admin/config/development/performance. After this clear your cache.
Most important configuration related to Varnish i.e default.vcl can be altered in various ways as per your requirements. Read the official documentation to modify it as per the caching requirements.
Here we’ll not stop after setting up Varnish with our Drupal 8 website, we will also test it to assess if it reaches our expectations.
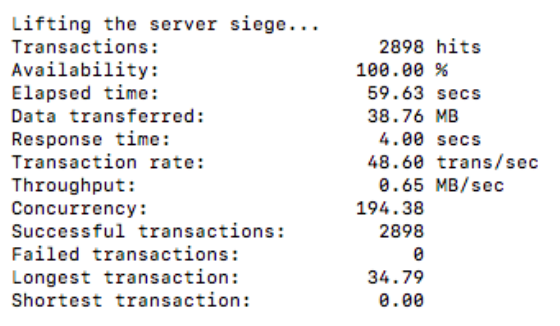
I added around 50,000 Nodes in Drupal 8 website. Set up siege on the server and did testing with following parameters.
The number of Concurrent Users: 250.
Testing Time: 60.
URL: Hit Any URL randomly.

There wasn’t much content which was served by Varnish as the cache was cleared before the testing.
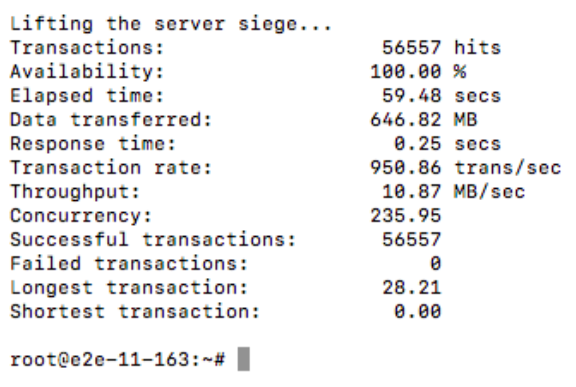
I did another test on the same website, without clearing cache to test Varnish.

There is a significant increase in transactions and transaction rate. Response time has also dropped significantly.
Subscribe
Related Blogs
Drupal's Role as an MCP Server: A Practical Guide for Developers

"The MCP provides a universal open standard that allows AI models to access real-world data sources securely without custom…
What’s New in Drupal CMS 2.0: A Complete Overview

"Drupal CMS 2.0 marks a significant change in the construction of Drupal websites, integrating visual site building, AI…
Drupal AI Ecosystem Part 6: ECA Module & Its Integration with AI

Modern Drupal sites demand automation, consistency, and predictable workflows. With Drupal’s ECA module, these capabilities…


