There are millions of websites on the internet and each website at least has a hundred thousand web pages. Search engine giants like Google use web crawler known as webots to crawl the web and find out information that a user requests for.
To find and present each specific information asked, is like finding a needle in a haystack. No matter how robust the search engine may be, it is a cumbersome job. To assist google bots in indexing pages of a website, XML sitemaps are used.
An XML sitemap is a structured list of all the URLs in a website created using XML which are used by search engines.
A basic example of an XML sitemap:
<?xml version="1.0" encoding="UTF-8"?>

<urlset xmlns="http://www.sitemaps.org/schemas/sitemap/0.9">

   <url>

      <loc>http://www.example.com/</loc>

      <lastmod>2005-01-01</lastmod>

      <changefreq>monthly</changefreq>

      <priority>0.8</priority>

   </url>

</urlset>
In Drupal, the creation of sitemaps was earlier managed by the XML sitemaps module. But due to the non-functioning of the module and users reporting a lot of bugs, the priority of which ranged from normal to critical, an alternate module now known as Simple XML sitemaps was developed. However, with time it replaced the previous version since it was lighter, simpler (to use) and adhered to the latest XML sitemap standard.
In this article, we are going to discuss how to install, configure and the uses of simple XML sitemap module.
Uses of SimpleXML Sitemap
- Listing of URLs: Sitemaps are used for listing of URLs present in a website. This helps crawlers to find pages in a site which otherwise would have been hard to find.
- Priority Tags: Sitemaps have the option of tagging pages on the basis of priority. This helps the search engines and crawlers to determine which page needs to be prioritized.
- Providing Crawlers with Relevant Information: Lastmod and changefreq provide search engines with information such as when a page last changed, and how often the page is likely to change which helps them crawl a site in a more optimal way.
- Creation of Google Image Sitemaps: Through indexing, all images attached to entities, google image sitemaps are created. This includes images uploaded through the image field as well as inline images uploaded through the WYSIWYG.
- SEO: Search engine optimization means when the results are generated by the search engine efficiently. This is possible only when all the necessary information required by the search engine are provided without any bottlenecks. Sitemaps help in reducing such bottlenecks by providing most of the information required by a search engine to carry out its job efficiently.
Installation Process
In Drupal to install modules a user can follow one of the following ways, namely;
- Using the Administrative menu.
- Using Drush.
- Using Composer.
- Using the Drupal console.
Using The Administrative Menu
In order to start the installation process, we need to find the required module. Search for the following link https://www.Drupal.org/project/. This will open the download and extend page as shown below.
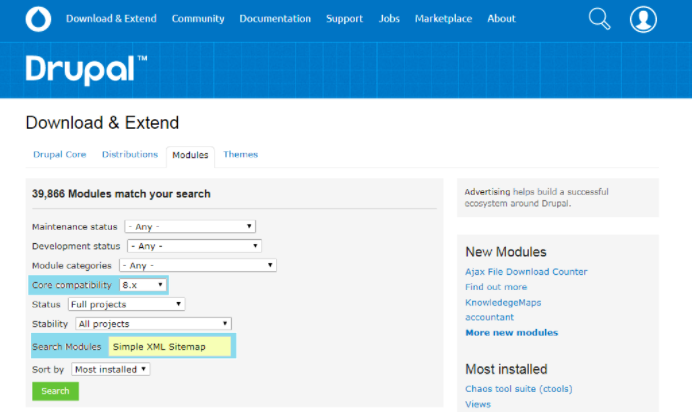
Now, we need to type in Simple XML Sitemap in the Search Modules field and select the Core compatibility from the drop-down menu and click on the Search button. This will reveal a list of results matching the keywords entered by the user. Now click on Simple XML Sitemap from the list and this should take you to the download page.
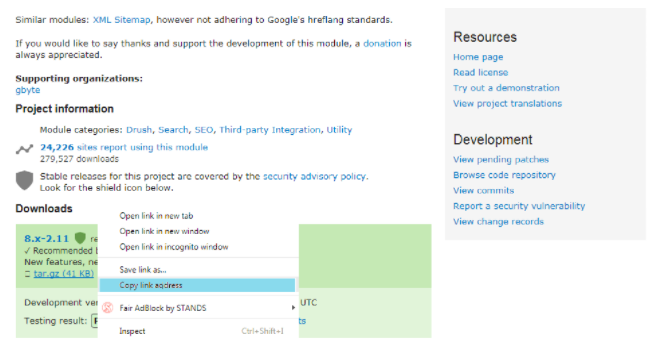
After reaching the download page, scroll down and there are two options to download the file i.e tar.gz and .zip.
Right-click on the tar.gz link. and select Copy link address, as shown above in fig 3.

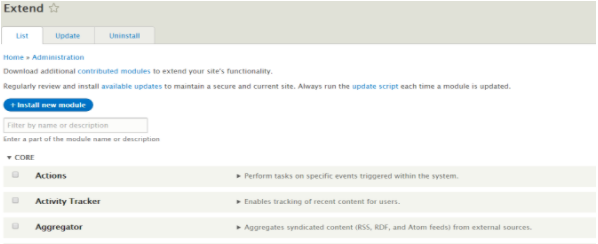
In the Manage administrative menu, navigate to Extend. Click Install new module. The Install new module page appears.
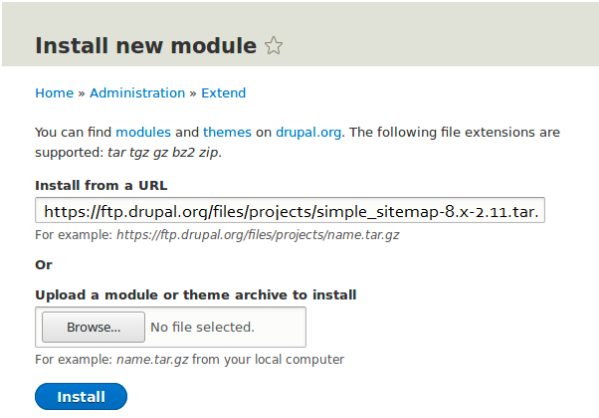
- In the field 'Install from the URL', paste the copied download link. i.e. https://www.Drupal.org/project/simple_sitemap/releases/8.x-2.11
- Click Install to upload and unpack the new module on the server. The files are being downloaded to the modules directory.
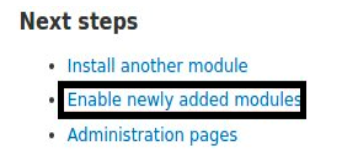
- Click Enable newly added modules to return to the Extend page. If you used the manual uploading procedure, start with this step, and reach the Extend page by using the Manage administrative menu and navigating to
Extend.
- Locate and check Simple XML Sitemap.
- Click Install to turn on the new module.
- Run Cron to generate the sitemap
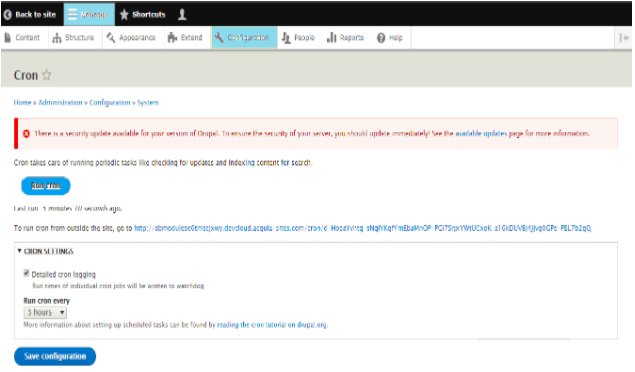
To run Cron, navigate to Manage/Configuration/System/Cron which will open a page as displayed above in fig 7.
Using Drush
Drush is a command line shell and Unix scripting interface for Drupal used for interacting with code like modules, themes or profiles. It also runs SQL queries, update.php and utilities like cron or clear cache. Drush can be installed through this link.
Installing modules with Drush is really quick and easy. Only two commands are necessary for installing and enabling modules.
- For installing a module, type drush dl <machine name of the module>
- For enabling the downloaded module, type drush en <machine name of the module>
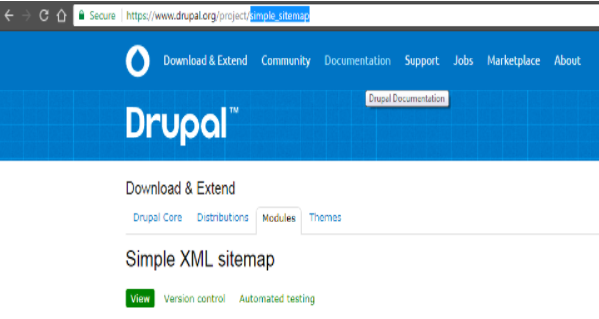
In the screenshot below, the highlighted part is the machine name of Simple XML Sitemap module, so, the commands in drush console would be as follows;
drush dl simple_sitemap
drush en simple_sitemap -y
Using Composer
To download modules using composer in Drupal, we need to type in the following command:
composer requires “Drupal/ <modulename> : <version>”
In this case, the exact command will be as follows composer require “Drupal/simple_sitemap : 2.11”
Specifying the version name is optional but they need to be executed at the root of Drupal install.
After running the above command, the composer will carry out the necessary tasks required to install the requested module.
Using Drupal Console
Modules can also be installed using Drupal console. The syntax for the command is as follows;
Drupal module : download [arguments] [options]
Drupal module : install [arguments] [options]
For downloading and installation of Simple XML sitemap, the specific command will be;
Drupal module: download simple_sitemap
--path=”modules/contrib”
The pathname for storing the downloaded module needs to be specified. Since this is a contributed module, we store it in the “contrib” folder.
Drupal module: install simple_sitemap
Configuration Options
After running Cron, when we check our sitemap, it is displayed as something similar as in the example below.
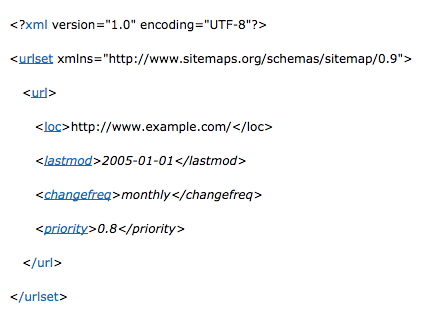
The tags in the above XML sitemap are discussed below;
| Tag | Status | Description |
|---|---|---|
| <urlset> | Required | Encapsulates the file and references the current protocol standard. |
| <url> | Required |
Parent tag for each URL entry. The remaining tags are children of this tag. |
| <loc> |
Required |
URL of the page. This URL must begin with the protocol (such as HTTP) and end with a trailing slash if a web server requires it. This value must be less than 2,048 characters. |
| <lastmod> | Optional | The date of last modification of the file. This date should be in W3C date-time format. This format allows a user to omit the time portion if desired and use YYYY-MM-DD. |
| <changefreq> | Optional |
How frequently the page is likely to change. This value provides general information to search engines and may not exactly control how often they crawl the page. Valid values are:
The value "always" should be used to describe documents that change each time they are accessed. The value "never" should be used to describe archived URLs. |
| priority | Optional | The priority of this URL relative to other URLs on a site. Valid values range from 0.0 to 1.0. This value does not affect how the pages are compared to pages on other sites—it only lets the search engines know which pages are deemed most important for the crawlers. The default priority of a page is 0.5. Assigning a high priority to all of the URLs on a site is not likely to help. Since the priority is relative, it is only used to select between URLs on a site. |
As you notice there is only one URL i.e. the homepage listed in it. This is because we haven't enabled sitemaps for our content types yet. In order to include URLs in sitemaps, we need to enable them.
To include items, we need to navigate to Structure/Content Types/ and select the type of content that we want to include in our sitemaps. After we navigate as directed, we will end up on a page that will let us manage settings for .the entity types that we have selected. Below is a screenshot of the same.
We have to option to include or exclude content types, prioritize them by choosing a number from the drop-down menu frequency of regenerating index and whether to include or not to include images.
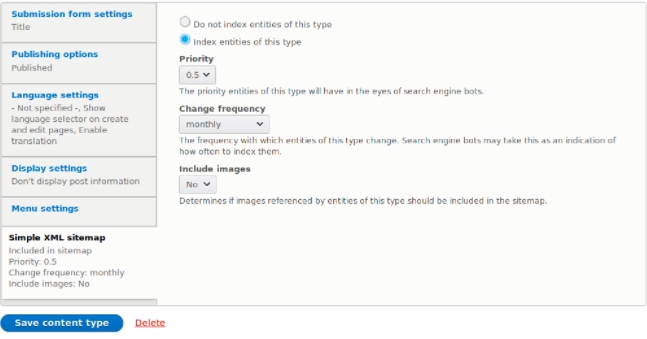
The module permission 'administer sitemap settings' can be configured under /admin/people/permissions.
Inclusion settings of bundled entities can be overridden on a per-entity basis. via the bundle, instance edit form e.g. node/1/edit to override its sitemap settings.
To reflect the new configuration instantly, we need to check 'Regenerate sitemap after clicking save'. This setting only appears if a change in the settings has been detected.
We can also add our own custom content types.
Ideal Configuration
While creating sitemaps, there won’t be a single universal setting that would work for each and every type of websites, because, websites differ in form and functionality. Some websites may contain articles while others may be shopping sites, information sites etc.. Therefore, an ideal configuration would be dependent on the type of website that the sitemap is being prepared for.
However, a general idea can be provided based upon which configuration decisions can be made.Below we will discuss each configurable option based on some specific conditions.

Sitemap generation interval refers to the rate at which the sitemap will be regenerated. If the website contents are updated frequently, choose a lesser value from the drop-down menu and vice-versa if the contents remain static for a longer period of time.
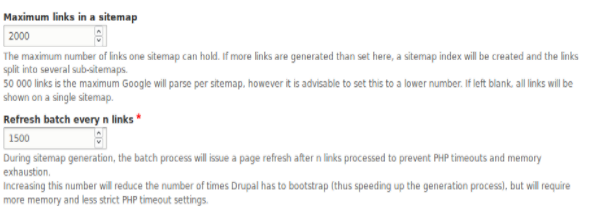
Maximum links in a sitemap should always be lower than the value that Googlebot can parse in a single sitemap.
If the number of links exceeds 50000, a sub sitemap needs to be considered.
To prevent PHP timeouts and memory exhaustion, the batch process needs to refresh after processing a certain number of links. However, if the number is set too low, the page will be refreshed more frequently and setting a high value would reduce the number of times the page refreshes thereby increasing the speed but consuming a greater chunk of memory.
Use of https is recommended because of its security and authenticity. When traffic passes to an https site, the referral data is preserved, unlike HTTP where it is stripped of all referral data. Also, Google has confirmed a minimal ranking boost to sites using https.
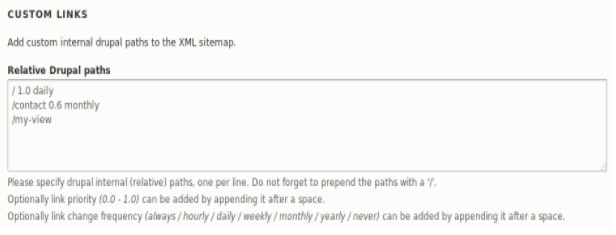
Custom links can be added on this page and also the priority for that specific page can be set which ranges from 0.0 to 1.0 where the smaller number represents lower priority and larger number high priority. Also, the change frequency of the link can be set which refers to the interval at which the page gets updated which needs to be set as always is the page gets updated very frequently and so on.
Search engines use XML sitemaps to learn about the site's structure and making a sitemap doesn't necessarily mean its inclusion in the web index but what it does is, it helps the search engine to crawl the site in an efficient manner and have a better chance of being crawled in the future if the sitemap contains valid and clean URLs.
Subscribe
Related Blogs
Inside the Drupal AI Summit: Themes, Speaker and What To Expect

“ The web is changing fast, and AI is rewriting the rules. It writes content, builds pages, and answers questions directly,…
FOST and Drupal AI Initiative: Next Era of Responsible AI

Three years after the launch of generative AI tools marked a new age for artificial intelligence, almost 90% of survey…
Drupal AI Ecosystem Part 5: AI Content Suggestions

Drupal has steadily evolved from being just a content management system into a flexible platform that incorporates emerging…


