“The Display Suite module (DS) allows you to take full control over how your content is displayed using a drag and drop interface. Arrange your nodes, views, comments, user data etc. the way you want without having to work your way through dozens of template files.”
Layouts of all the views in a Drupal site are controlled by the installed theme. To override them, you need to override the HTML and CSS rendered by the theme. And to do so, you must create a custom theme and define templates using the Twig template engine.
To simplify this process, a contributed module Display Suite can be used to customize the layouts of the view modes as per the requirement. It can alter view modes of content items, blocks, taxonomy terms, users, and comments. It can be also used to build new layouts, add custom CSS classes, and add custom fields to content views.
Pre-requisites
The only prerequisite to the Display Suite module is Layout Discovery, which comes with Drupal core.
Downloading and Installing Display Suite
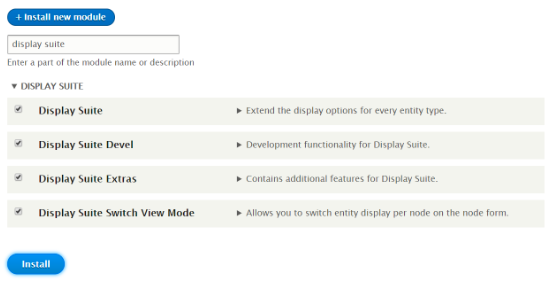
The Display Suite project comes with three sub-modules – Display Suite Devel, Display Suite Extras, and Display Suite Switch View Mode. Follow any of the four methods shared below to download and install the module.
Using UI
- Navigate to Manage → Extend → Install new module → enter the .tar.gz or .zip URL of the Display Suite module → hit "Install".
- Once you have downloaded and installed, click on "Enable newly added modules".
- Find Display Suite in the list of modules, select it and click on "Install". Additionally, you may also install its sub-modules.
$ cd /var/www/html/drupal8
Using Composer
- Add Display Suite package using composer
$ composer require "drupal/ds"
- Enable Display Suite module by navigating to Manage → Extend, selecting Display Suite and click "Install". Additionally, you may also install its sub-modules.
Using Drush
- Download and enable Display Suite using Drush
$ drush dl ds
$ drush en ds ds_devel ds_extras ds_switch_view_mode -y
Using Drupal Console
- Download and install Display Suite using Drupal Console
$ drupal module:download ds
$ drupal module:install ds ds_devel ds_extras ds_switch_view_mode
Note that the Display Suite Devel sub-module requires the Devel module to be pre-installed.
Customizing Content Layouts
The Display Suite module basically overrides the "Manage Display" tab of the content entities. It divides the content area into "regions", providing greater flexibility and control over the layout. It also adds its own fields to the views including Bundle name, Last modified, Post date, etc. To change the display layout, follow the below steps:
- Navigate to Manage → Structure → Display Suite to find the list of all the content items.
- Click on "Manage Display" against the content item you wish to change the layout for.
- Select the view mode tab you want to edit. You may add more view modes from the Display Suite widget under "Custom display settings"
- Select a layout from the widget below the entity fields, for example, Fluid two column stacked layout, and click on "Save".
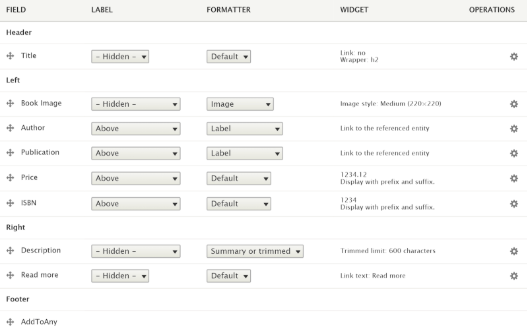
You can now drag and drop fields into the regions created by the module. Play around with the placement of the fields to get the desired layout, and click on "Save" to apply.

Adding CSS classes
One important thing to note here is that these regions are not responsive out-of-the-box, i.e. they don't adapt according to the display viewport. However, CSS classes can be added to regions as well as to the individual fields to apply custom themes. This feature of Display Suite is useful when using a theme like Bootstrap or Foundation which provide grid system through CSS classes. To add and apply CSS classes, follow the below steps:
- Navigate to Manage → Structure → Display Suite to find the list of all the content items and click on "Manage Display" against the desired content item.
- Click on "Custom classes" in the widget located below the fields and select "Manage region and field CSS classes"
- Add CSS classes supported by your theme separated by newlines and optionally give them a label using the pipe operator. Click on "Save configuration" to save the CSS classes and their labels. For example:
col-md-3|Bootstrap 3 column medium
large-8 columns|Foundation 8 column large
- Now you can select the added classes for the layout and its regions. Click on “Save” to apply.
Adding wrappers for regions
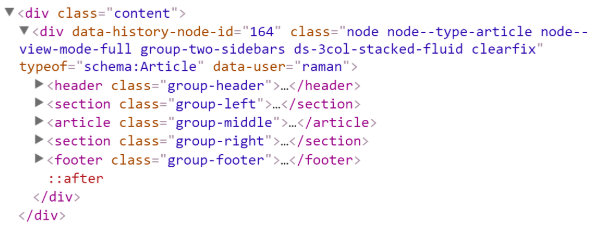
Display suite also allows customizing the wrapper HTML tag for the regions. These wrappers include div, span, section, article, header, footer, aside and figure. It is recommended to use these wrapper HTML tags instead of a generic div tag as they provide a modern and cleaner approach, and also helps search engines and screen readers to distinguish the content from other elements on the page. To add and apply wrappers classes, follow the below steps:
- Navigate to Manage → Structure → Display Suite to find the list of all the content items and click on "Manage Display" against the desired content item.
- Click on "Custom wrappers" in the widget located below the fields.
- Choose the desired wrapper HTML tag for the regions of your layout. You can also add a link, and provide additional attributes to the layout wrapper tag. This can be useful for teaser or custom view modes.
Adding Display Suite fields
Another interesting feature that Display Suite provides is the ability to add fields to the view modes. Display Suite provides its own fields, as well as allows us to create a custom block or a token field. Note that these fields will not affect the actual entity object, but only the view of the content.
- Navigate to Manage → Structure → Display Suite to find the list of all the content items and click on the "Fields" tab.
- Select the type of the field to add. This may be a block field, token field, or a copy of a Display Suite field. The last one can be used to create a variant of a field.
- Add a label, select the entity type, optionally apply a limit to the field.
- Select the block, or add a field content depending upon the type of the field and click “Save” to add.

- To use the newly created fields, navigate to “Manage Display” of the content item and add the field(s) in the desired region.

Switch Mode Sub-Module
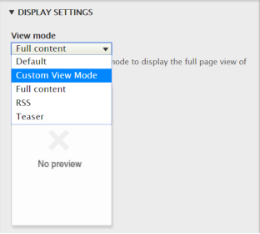
Display Suite comes with a very useful sub-module known as Switch Mode. This allows the site builder to add new view modes and provide the content editors the ability to choose a view mode at the time of content editing.
- Navigate to Manage → Structure → Display Modes → View Modes, click on “Add view mode” and select the entity type.
- Give a suitable name for the view mode and click on “Save”
- Go to “Manage Display” tab of the desired content item.
- Enable the newly created view mode from the “Custom display settings” of the widget present below the fields.
- Now you can add a layout and arrange the fields into regions for this view mode.
- Additionally, you may want to give permission to the content editors to switch between the view modes by visiting /admin/people/permissions
Display Suite provides the ability to the site builders to manage layouts for the content without creating twig files. In case, you are still not satisfied, you can override the twig files used by the module or build your own template. Display Suite also provides a couple of drush commands to generate boilerplate code to create a plugin or a template. Refer ds/drush/ds.drush.inc for syntax and usage details.
Let us know in the comments below how you liked the article.
Subscribe
Related Blogs
Inside the Drupal AI Summit: Themes, Speaker and What To Expect

“ The web is changing fast, and AI is rewriting the rules. It writes content, builds pages, and answers questions directly,…
FOST and Drupal AI Initiative: Next Era of Responsible AI

Three years after the launch of generative AI tools marked a new age for artificial intelligence, almost 90% of survey…
Drupal AI Ecosystem Part 5: AI Content Suggestions
Drupal has steadily evolved from being just a content management system into a flexible platform that incorporates emerging…


