JSON is one of the famous ways to share the data used in API on the internet. That's because it’s flexible and easy to use and parse. But, sometimes JSON is just not enough nor the other ways to transfer data like XML, hal_Json etc.
Now comes the infamous comma separated values aka the CSV format. CSV is used for tabular data most often like, for instance, if you are having a spreadsheet lying around try opening it with good old notepad, you’ll see some comma-separated values (CSV).
Let’s see how you can set it up, it’s quite simple but before going ahead we are going to need a couple of things. Remember this is strictly for Drupal 8 the modules for Drupal 7. For instance, in Drupal 7 you need services modules concurrent to REST module for the REST implementation in Drupal 8, you don’t.
We need a couple of modules, as listed below:
- RESTful Web Services
- REST UI (You don’t need it if you are going to implement using Views)
- Serialization
- Serialization (CSV)
- Installing CSV library.
- Composer to install the CSV library
- Postman Extension (optional, can be used for testing services)
Setting up Serialization (CSV) module needs a library called CSV we are going to install the library.
Enable and install the 1, 2, 3 modules. As I said you can’t install the 4th module without installing the library, so, let’s install the library.
Installing CSV Library
Go to the director of the Drupal site and use the composer command
composer require league/csv
Wait for the install to complete, vendor -> league -> CSV these following directories should be present or else the installation failed. Now, go and enable and install the Serialization (CSV) module if you are facing any error, which is quite common when you are using Composer (-_-)
There is an issue raised in the Drpual.org website do check it out. The #6 comment might be helpful in that link.
Set your Desired Permission in for the Service
It’s time to set your permission, to allow which type of user can access your content, in my case I am going to give all access related to “Nodes” to all the users including the anonymous user since I am not going to use any type of authentication, in your case it’s probably not a good idea to expose your API to anonymous user, please do consider researching if you don’t know what you are doing.
Go to the module RESTful Web Services and click on permission and set your desired permission here is an example of my permissions.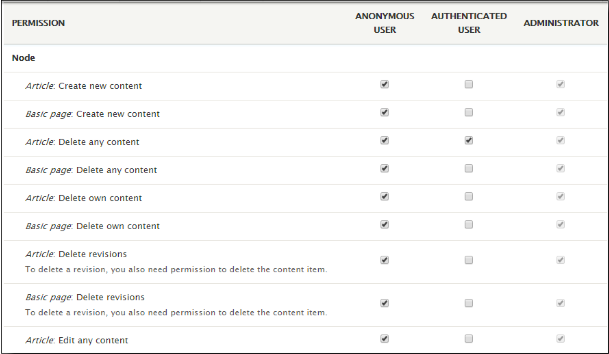
Using REST UI to Expose your API
- Now, let’s use the Rest UI module to expose your API.
- Go to rest UI and hit configure
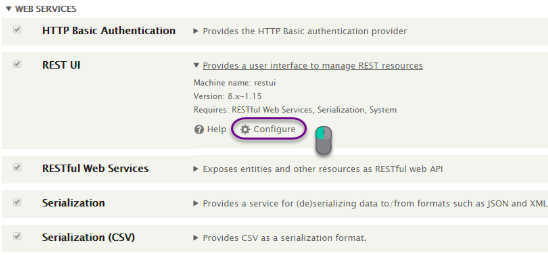
When that’s done, enable the service you want to use since I am going to the user the nodes I will enable Content
By default, the format will be JSON or hal_json or XML… now we have to enable the CSV format.
Setting CSV as the Format for the Service
It’s pretty simple, while in the configure of the Rest UI module, click on edit for the service.
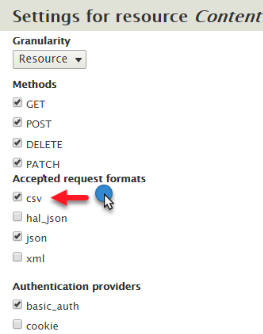
If you didn’t find it your Serialization (CSV) module isn’t set up correctly
Don’t forget to save the configuration.
Using the Service
Now, we’ll test it out first by setting the format as JSON.
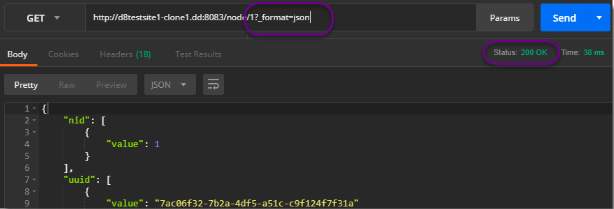
The Status is 200 which means everything went fine and you got the response.
There you have to replace CSV instead of JSON for CSV values.

That’s it, you have to get the response code of 200 OK.
Since we are on the topic let’s just show a quick view of how we can set it on Views, that’s a pun (─‿‿─)
Go to views and add a new view while adding under the REST EXPORT SETTINGS check the Rest and provide it a path, that is the path with which your view will be available.
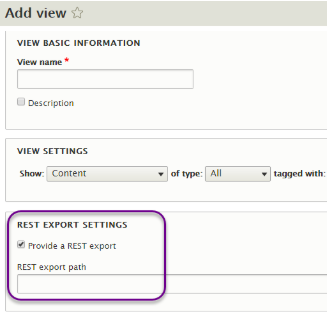
For instance, I will set up a view RESTful with path /myrest to get the CSV data out of it, all you have to do is click on Settings that is beside Serializer under format and select CSV, apply the settings.
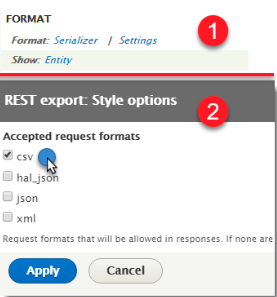
If you need any filter or authentication change them to your need accordingly
And, that’s about it you can see all our CSV formatted data and the path at which it is available in the preview. You can call the API with that path.
If you run into any problem and Google is of no use, don’t hesitate to drop a comment below.
Subscribe
Related Blogs
Back from DrupalCon Atlanta 2025: A Milestone Moment for OpenSense Labs

“Fit. Fast. Built to Last.” That wasn’t just a tagline, it was the mindset we brought to DrupalCon Atlanta 2025. And judging…
Explainable AI Tools: SHAP's power in AI

Do you know what are explainable AI tools? Explainable AI tools are programs that show how an AI makes its choices. They help…
AI Chatbot: Crafting with Precision & Personality

In the realm of artificial intelligence, developing an AI chatbot that not only delivers accurate information but also…


